Cookie decorating used to intimidate me completely until last Halloween when my daughter’s baking club challenged parents to create “professional-looking” Halloween cookies. Standing in my kitchen with a batch of beautifully spiced pumpkin cookies cooling on the counter, I felt overwhelmed by the prospect of turning them into something worthy of Pinterest.
Then inspiration struck as I watched melted white chocolate slowly drip from my spoon. Instead of fighting the chocolate’s natural flow, I embraced it, creating ghostly shapes that looked delightfully spooky rather than perfectly uniform. Those imperfect, whimsical ghosts became the hit of the baking club party, proving that sometimes the most beautiful results come from letting go of perfection.
These Spooky Ghost Brown Butter Pumpkin Cookies have since become our family’s signature Halloween treat – combining the sophisticated flavors of brown butter and warm spices with the playful charm of friendly ghosts that make everyone smile.
Why These Ghost Cookies Will Become Your Halloween Signature
Brown Butter Magic Creates Depth
The nutty complexity of brown butter elevates these cookies beyond typical pumpkin treats, creating sophisticated flavor that appeals to adult palates. Moreover, this technique adds an irresistible aroma that fills your kitchen with the essence of autumn comfort and warmth.
Simple Decorating Technique Anyone Can Master
Unlike intricate royal icing designs, these ghost decorations embrace imperfection and organic shapes. Additionally, the forgiving nature of melted chocolate means each cookie develops its own personality, making the decorating process enjoyable rather than stressful.
Perfect Make-Ahead Dessert
Both the base cookies and decorations can be completed in stages, making them ideal for busy Halloween preparation schedules. Furthermore, decorated cookies stay fresh for several days, allowing you to prepare them well before parties or trick-or-treat events.
Crowd-Pleasing Appeal for All Ages
Children love the cute ghost faces while adults appreciate the sophisticated pumpkin and brown butter flavors. Similarly, the soft, chewy texture satisfies every cookie preference, from those who love crispy edges to fans of tender centers.
Essential Ingredients for Ghostly Perfection
Cookie Foundation (Makes 12 cookies)
Base Cookie Requirements:
- 1 batch Brown Butter and Maple Chewy Pumpkin Cookies (following Butternut Bakery’s recipe for optimal flavor and texture)
The brown butter creates nutty depth while maple syrup adds natural sweetness that complements pumpkin’s earthiness. Additionally, the chewy texture provides the perfect canvas for chocolate decoration that won’t crack or break.
Decoration Arsenal
For Ghost Creation:
- High-quality white chocolate (Ghirardelli melting wafers work exceptionally well for smooth application)
- Black candy melts (provide consistent color and easy piping properties)
- Piping bag (offers better control than plastic bags for precise detail work)
Essential Tools for Success
- Medium cookie scoop (ensures uniform cookie sizes for professional appearance)
- Light-colored baking pans (prevent over-browning and allow accurate doneness assessment)
- Small spoon (for spreading white chocolate ghost shapes)
- Parchment paper (for practicing techniques and easy cleanup)
Step-by-Step Instructions for Hauntingly Beautiful Results
Preparing Your Cookie Canvas
Step 1: Perfect the Base Cookies Follow the Brown Butter and Maple Chewy Pumpkin Cookie recipe precisely, ensuring cookies are baked until edges are set but centers remain soft. Allow cookies to cool completely on wire racks before decorating – warm cookies will cause chocolate to melt and lose definition.
Step 2: Set Up Your Decorating Station Arrange cooled cookies on parchment-lined surfaces with adequate spacing between each one. Having everything organized before beginning decoration prevents rushed application that can result in messy or uneven ghost shapes.
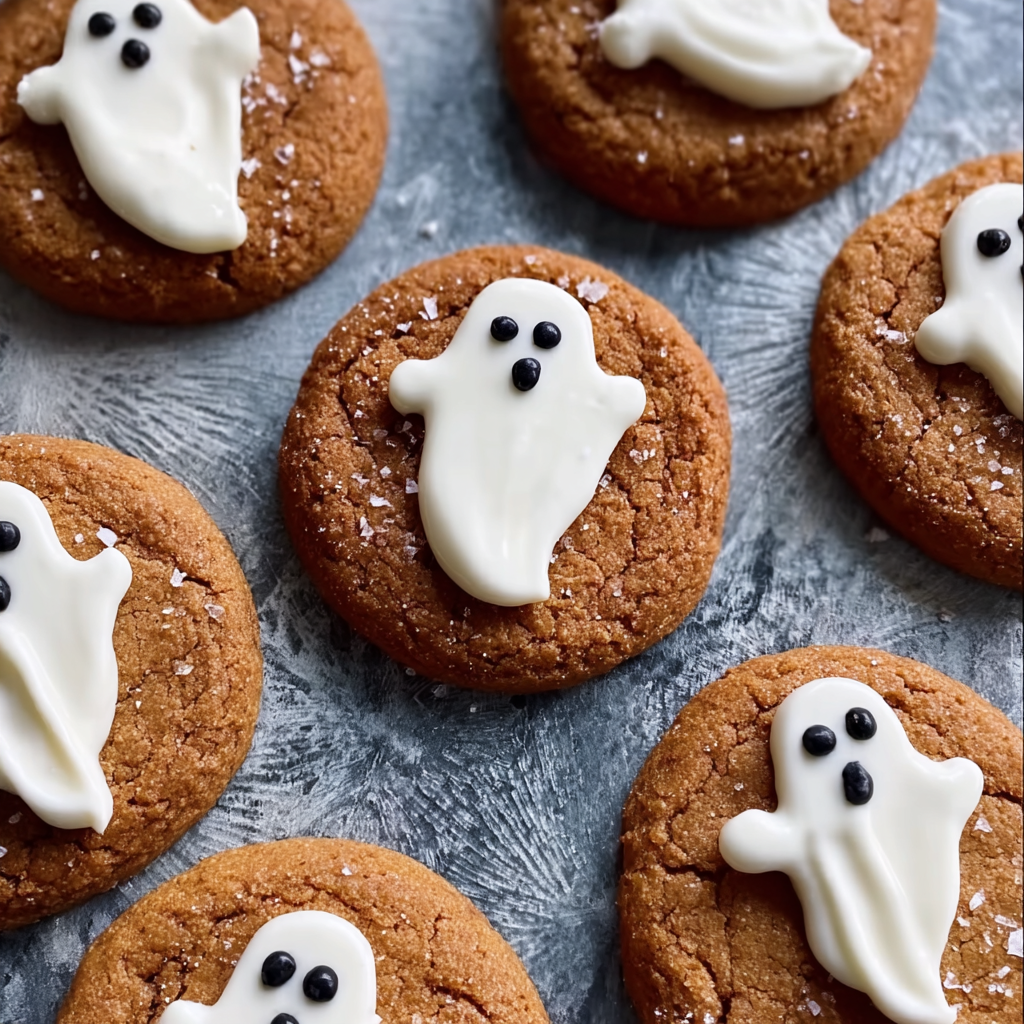
Mastering the White Chocolate Ghost Technique
Step 3: Achieve Perfect Chocolate Consistency Melt white chocolate in 30-second microwave intervals, stirring between each session until completely smooth. The chocolate should flow easily but not be so thin that it runs off the cookie immediately upon application.
Step 4: Practice the Ghost-Making Motion On parchment paper, practice spooning small dollops of chocolate and using the back of a spoon to gently drag downward, creating ghost shapes. This practice session helps develop muscle memory before working on actual cookies.
Step 5: Create Your Chocolate Ghosts Place a small dollop of white chocolate near the top of each cookie. Using light pressure, slowly drag the back of your spoon downward to create an elongated ghost shape with natural flowing edges that resemble ethereal spirits.
Bringing Ghosts to Life with Facial Features
Step 6: Allow Setting Time Let white chocolate harden completely at room temperature or place cookies in refrigerator for faster setting. Attempting to add details before chocolate sets will cause features to sink or blur into the base layer.
Step 7: Prepare Black Candy Melts Melt black candy melts according to package directions until completely smooth. Transfer to piping bag and cut a very small opening – start smaller than needed, as you can always enlarge the hole but cannot make it smaller.
Step 8: Add Ghostly Facial Features Pipe two small dots for eyes and a slightly larger dot or oval for the mouth on each ghost. Work quickly but deliberately, as candy melts set faster than regular chocolate and become difficult to pipe once they begin cooling.
Creative Serving Suggestions
Halloween Party Presentation
Arrange cookies on black serving plates with plastic spiders scattered around for dramatic effect. Additionally, create different ghost expressions by varying mouth shapes – some surprised, others smiling, for engaging visual variety that guests will love examining.
Gift-Giving Ideas
Package individual cookies in clear cellophane bags tied with orange and black ribbons for charming Halloween gifts. These treats make perfect hostess gifts, teacher appreciation presents, or party favors that recipients will actually want to eat.
Delicious Recipe Variations
Chocolate Ghost Cookies
Use chocolate pumpkin cookies as the base and create ghosts with white chocolate for dramatic contrast. This variation appeals to serious chocolate lovers while maintaining the spooky ghost theme that makes these cookies so Halloween-appropriate.
Mini Ghost Cookie Bites
Make smaller cookies using a small cookie scoop and create tiny ghosts for bite-sized treats perfect for parties. These miniature versions allow guests to sample multiple cookies without feeling overly indulgent.
Orange Pumpkin Ghosts
Tint white chocolate with orange food coloring to create pumpkin-colored ghosts that blend into the cookie base. Use dark chocolate for facial features to maintain visibility against the orange background.
Glow-in-the-Dark Ghost Cookies
Add glow-in-the-dark food coloring to white chocolate for ghosts that literally glow at Halloween parties. This dramatic effect creates unforgettable cookies that become conversation starters at any gathering.
Make-Ahead Tips for Stress-Free Baking
Timeline Strategy
Bake base cookies up to three days before decorating and store in airtight containers at room temperature. Then, complete decorations 1-2 days before serving for optimal freshness and appearance.
Storage Solutions
Store decorated cookies in single layers separated by parchment paper in airtight containers. Avoid stacking decorated cookies, as chocolate decorations can stick together or become damaged during storage.
Freezing Options
Undecorated pumpkin cookies freeze beautifully for up to three months when wrapped properly. However, avoid freezing decorated cookies, as chocolate decorations may develop condensation and lose their crisp appearance when thawed.
Important Notes for Decoration Success
Always use light pressure when spreading white chocolate to avoid picking up cookie crumbs that create a messy appearance. Additionally, work with completely cooled cookies to prevent chocolate from melting and losing its ghost shape definition.
Quality chocolate makes a significant difference in both appearance and taste. Furthermore, avoid chocolate chips for melting, as they contain stabilizers that prevent smooth melting and create lumpy textures unsuitable for decoration work.
Practice your ghost-making technique on parchment paper before decorating actual cookies. Moreover, have extra white chocolate melted and ready, as the technique becomes easier with repetition and confidence builds with practice.
Frequently Asked Questions
Can I use regular chocolate chips instead of melting wafers? Melting wafers are specifically formulated for smooth melting and easy handling, making them superior for decoration work. However, if using chocolate chips, add a small amount of coconut oil to help achieve proper consistency for spreading.
How long do decorated cookies stay fresh? Properly stored decorated cookies maintain quality for up to one week at room temperature. However, they’re best consumed within 3-4 days for optimal texture and flavor, especially if stored in humid environments.
What if my white chocolate is too thick to spread easily? Reheat chocolate briefly in 15-second microwave intervals until it reaches proper flowing consistency. Alternatively, add a tiny amount of neutral oil like coconut oil to thin the chocolate without affecting flavor.
Can I make these cookies gluten-free? Yes! Substitute the flour in the base cookie recipe with a high-quality gluten-free flour blend that contains xanthan gum. The decoration process remains exactly the same regardless of flour type used.
How do I prevent the black candy melts from smearing? Ensure white chocolate is completely set before adding facial features, and work quickly when piping details. Additionally, store decorated cookies in cool, dry places to prevent candy melts from becoming soft and smudging.
What’s the best way to transport these decorated cookies? Use sturdy containers with tight-fitting lids and place cookies in single layers with parchment paper between levels if stacking is necessary. Avoid warm cars or direct sunlight that could cause chocolate decorations to melt during transport.


