Every Halloween, I find myself scrambling to create something special that balances the holiday excitement with actual nutrition. This year, inspiration struck when my son declared that regular deviled eggs were “too boring” for Halloween morning. Challenge accepted! Armed with a carton of eggs and some black olives, I created these delightfully spooky Spider Eggs that had the whole family squealing with delight (and just a little bit of fear).
The best part? Watching my kids’ faces light up when they realized they were about to eat “spiders” for breakfast. These aren’t just any deviled eggs – they’re a conversation starter, a Halloween tradition in the making, and proof that breakfast can be both nutritious and absolutely thrilling.
Why These Spider Eggs Will Become Your Halloween Tradition
Perfect Protein-Packed Start
These eggs deliver substantial protein and healthy fats to fuel Halloween adventures. Additionally, they provide sustained energy that keeps kids satisfied longer than sugary breakfast alternatives, especially important when candy temptations lurk around every corner.
Interactive Breakfast Experience
Children love food that tells a story, and these spider eggs create an engaging breakfast experience. Moreover, kids can help arrange the olive “legs,” making them active participants in creating their spooky meal.
Elegant Enough for Adult Parties
While kids adore the creepy factor, adults appreciate the sophisticated flavor combination. Furthermore, these make stunning appetizers for Halloween parties, proving that playful food can still be refined and delicious.
Make-Ahead Convenience
Busy Halloween mornings become manageable when breakfast is already prepared. These spider eggs can be assembled the night before, leaving more time for costume adjustments and last-minute trick-or-treat preparations.
Essential Ingredients for Perfect Spider Eggs
Core Components (Serves 4)
- 4 large eggs (preferably farm-fresh for vibrant yellow yolks)
- ¼ cup high-quality mayonnaise (creates the perfect creamy texture)
- 1 teaspoon Dijon mustard (adds tangy depth and beautiful color)
- Salt and freshly ground black pepper (to taste, for seasoning balance)
- 8 large black olives (pitted Kalamata or black ripe olives work best)
Optional Flavor Enhancers
Consider adding a pinch of paprika for subtle smokiness, fresh chives for color contrast, or a dash of garlic powder for extra savory depth. Similarly, a tiny squeeze of lemon juice can brighten the overall flavor profile.
Step-by-Step Instructions for Spine-Tingling Success
Preparing the Perfect Hard-Boiled Foundation
Step 1: Master the Hard-Boiled Technique Place eggs in a single layer in a heavy-bottomed saucepan. Cover completely with cold water, ensuring at least one inch of water covers the eggs. This method prevents cracking and ensures even cooking throughout.
Step 2: Achieve the Perfect Cook Bring water to a rolling boil over high heat. Once boiling, immediately reduce heat to medium-low and maintain a gentle simmer for exactly 10 minutes. This timing creates fully set yolks without the gray ring that indicates overcooking.
Step 3: Stop the Cooking Process Immediately drain hot water and plunge eggs into an ice bath or run under cold water for several minutes. This rapid cooling prevents further cooking and makes peeling significantly easier.
Creating Your Spooky Masterpieces
Step 4: Prepare the Canvas Gently tap each egg all over and peel under cool running water, starting from the larger end where the air pocket is located. Cut each egg in half lengthwise using a sharp knife, creating clean, even cuts that showcase the yolk perfectly.
Step 5: Craft the Filling Carefully remove yolks and place them in a mixing bowl. Mash thoroughly with a fork until completely smooth. Then, blend in mayonnaise, mustard, salt, and pepper until the mixture reaches a creamy, pipeable consistency.
Step 6: Assemble the Base Using a spoon or piping bag, fill each egg white cavity with the yolk mixture, creating a slightly mounded surface. This elevation provides the perfect platform for your olive spiders to perch dramatically.
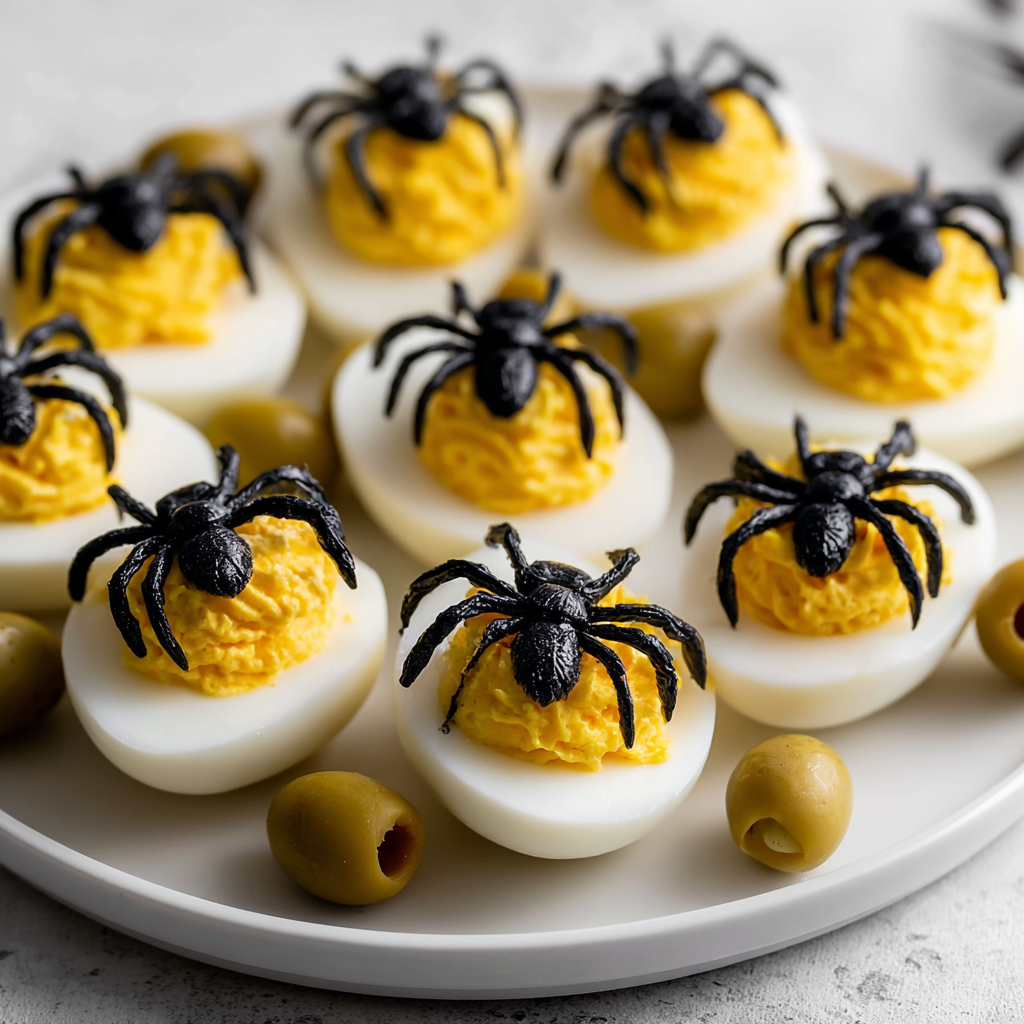
Bringing Your Spiders to Life
Step 7: Create Spider Bodies and Legs Cut each black olive in half lengthwise. One half becomes the spider’s plump body, while the other half gets sliced into thin strips to create eight realistic-looking legs.
Step 8: Final Assembly Place one olive half in the center of each filled egg to create the spider’s body. Then, arrange thin olive strips around the body, positioning four “legs” on each side. Vary the angles slightly to create more natural, lifelike appearances.
Creative Serving Suggestions
Presentation Ideas
Arrange your Spider Eggs on a dark serving platter to enhance the spooky effect. Additionally, surround them with fake spider webs, plastic spiders, or autumn leaves for maximum Halloween atmosphere that will impress guests of all ages.
Complementary Menu Items
Pair these eggs with Halloween-themed orange juice served in small pumpkins, or offer warm apple cider alongside. Furthermore, consider serving them with orange and black toast points or Halloween-shaped crackers for added festive flair.
Delicious Recipe Variations
Smoky Paprika Spiders
Add a teaspoon of smoked paprika to the yolk mixture for a deeper, more complex flavor. This variation creates beautiful orange-tinted filling that perfectly complements the Halloween color scheme while adding sophisticated smokiness.
Bacon Bit Spiders
Mix crumbled crispy bacon into the yolk filling for extra richness and texture. The salty, savory addition makes these eggs even more satisfying while maintaining the spooky visual appeal that makes them special.
Avocado Green Spiders
Replace half the mayonnaise with mashed ripe avocado for a healthier twist with stunning green color. This version provides additional nutrients while creating an eerily beautiful presentation that’s perfect for health-conscious Halloween celebrants.
Spicy Jalapeño Spiders
Finely mince jalapeño peppers and fold them into the yolk mixture for adults who enjoy heat. The subtle spice adds excitement without overwhelming the delicate egg flavors.
Make-Ahead Tips for Stress-Free Mornings
Preparation Timeline
Hard-boil eggs up to three days in advance and store them unpeeled in the refrigerator. Meanwhile, prepare the yolk filling mixture and store it separately in an airtight container for optimal freshness.
Assembly Strategy
Complete entire spider eggs the evening before serving, but cover them tightly with plastic wrap to prevent drying. However, for the freshest appearance, consider adding olive spiders just before serving to maintain their dramatic visual impact.
Storage Solutions
Assembled Spider Eggs stay fresh in the refrigerator for up to two days. Place them on a plate with toothpicks holding plastic wrap above the surface, preventing the wrap from touching the delicate olive arrangements.
Important Notes for Best Results
Always use eggs that are at least one week old, as fresh eggs are notoriously difficult to peel cleanly. However, if you only have very fresh eggs, add a tablespoon of baking soda to the cooking water to help with peeling.
Choose olives with firm texture rather than soft, mushy varieties that fall apart when sliced. Additionally, pat olive pieces dry before arranging them on the eggs to prevent the filling from becoming watery or sliding around.
When cutting olives for legs, use a very sharp paring knife and work slowly to create uniform strips. Moreover, having extra olives on hand allows for mistakes and ensures you have enough pieces to create perfectly proportioned spiders.
Frequently Asked Questions
Can I make these eggs without mayonnaise? Absolutely! Greek yogurt makes an excellent substitute, creating a tangier flavor while maintaining the creamy texture. Alternatively, mashed avocado provides richness with added nutritional benefits and creates an intriguingly green filling.
How do I prevent my hard-boiled eggs from cracking while cooking? Start with room-temperature eggs rather than cold ones straight from the refrigerator. Additionally, pierce the larger end with a pin to release pressure, and bring water to a boil before gently lowering eggs in with a spoon.
What if I can’t find black olives? Green olives work wonderfully and create a different but equally striking visual effect. You could also use pieces of black bean, dark grapes cut into strips, or even thin slices of black radish for creative alternatives.
Can I prepare these for a large Halloween party? Definitely! This recipe scales easily – simply multiply ingredients proportionally. For parties, consider making them smaller using quail eggs for elegant bite-sized appetizers, or double the recipe using extra-large eggs for heartier servings.
How do I keep the olive pieces from sliding off? Press olive pieces gently into the yolk mixture to help them adhere. Additionally, make sure the filling is thick enough to hold decorations – if it’s too loose, add a bit more mayonnaise or let it chill longer before assembling.
Are these eggs suitable for people avoiding gluten? Yes! This recipe is naturally gluten-free, making it perfect for guests with gluten sensitivities. However, always check your mayonnaise and mustard labels to ensure they don’t contain any gluten-containing additives or thickeners.


