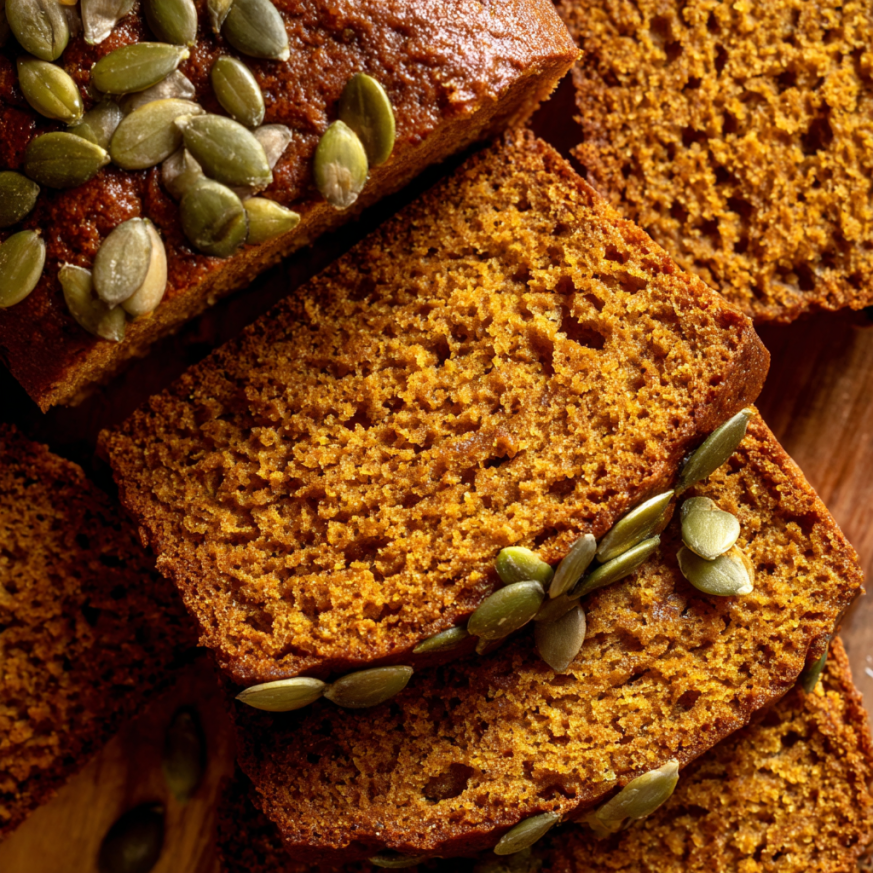
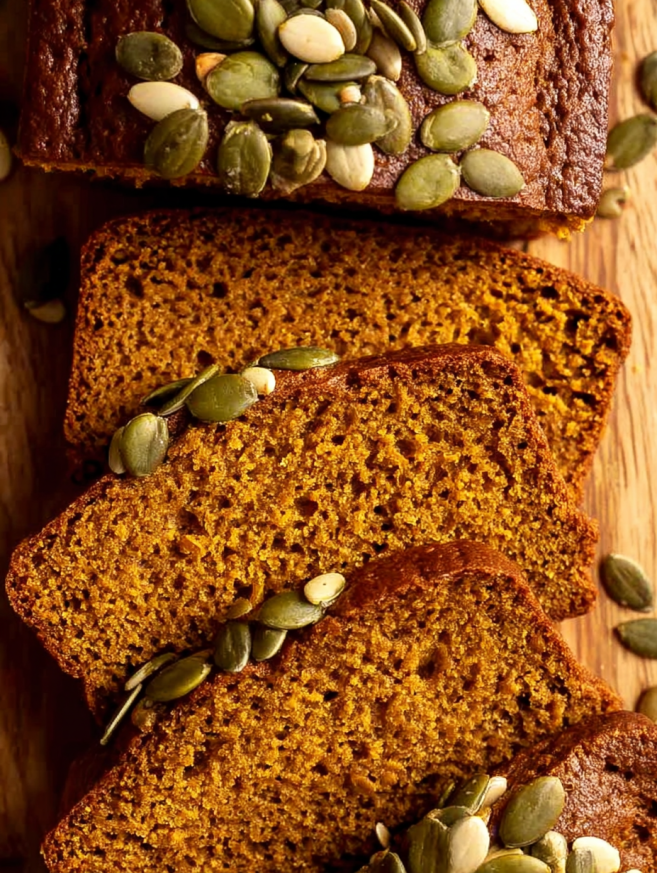
Every fall, without fail, I find myself craving that iconic pumpkin bread from Starbucks—you know the one. The ultra-moist loaf with warming spices and those crunchy pepitas on top that somehow stays tender for days. After years of buying slice after slice, I finally decided to crack the code and recreate it at home. The result? This copycat recipe that my family actually prefers to the original.
There’s something magical about the aroma of pumpkin bread baking in your own kitchen. The blend of cinnamon and pumpkin spice fills every corner of your home with the essence of autumn. This wonderfully tender loaf captures all those cozy fall flavors while being surprisingly simple to make—just one bowl, basic ingredients, and minimal effort required.
Total Time: 1 hour 25 minutes
Yield: 12 servings (1 loaf)
Course: Breakfast, Dessert, Snack
Cuisine: American
Why You’ll Love This Recipe
Copycat recipes can be hit or miss, but this pumpkin bread consistently delivers that Starbucks experience without the coffee shop price tag. One loaf costs just a few dollars to make at home, yet you get 12 generous slices—that’s a fraction of what you’d pay for individual pieces at the café.
The texture is what really sets this bread apart. It’s incredibly moist without being dense or gummy, thanks to the perfect ratio of pumpkin puree to flour and the careful balance of leavening agents. Each slice practically melts in your mouth, with just enough structure to hold together beautifully whether you’re eating it plain or toasted with butter.
Perfectly Spiced for Fall
The combination of ground cinnamon and pumpkin spice creates a warm, aromatic backdrop that lets the pumpkin flavor shine without overwhelming it. Unlike some pumpkin breads that taste more like spice cake, this recipe achieves the ideal balance where every element is noticeable but nothing dominates.
Those pepitas on top aren’t just decorative—they provide a delightful textural contrast to the tender crumb. Each bite combines soft, spiced bread with the satisfying crunch of toasted pumpkin seeds, elevating this from simple quick bread to something truly special.
Foolproof One-Bowl Method
Despite its bakery-quality results, this recipe requires minimal cleanup and no special techniques. The one-bowl method means you’re not juggling multiple mixing bowls or complicated steps. Mix your dry ingredients, whisk together the wet ingredients in another bowl, combine them, and pour into your pan. That’s it—no stand mixer, no complicated folding techniques, just straightforward baking that anyone can master.
Equipment You’ll Need
- 1 (9 x 5-inch) loaf pan
- Parchment paper
- 2 large mixing bowls
- Whisk
- Measuring cups and spoons
- Toothpick or cake tester
Ingredients
Dry Ingredients
- 1¾ cups (210g) all-purpose flour
- 1 teaspoon baking soda
- ½ teaspoon baking powder
- 2 teaspoons ground cinnamon
- 2 teaspoons pumpkin spice
- ½ teaspoon salt
Wet Ingredients
- ½ cup (120ml) avocado, olive, or canola oil
- ¾ cup (150g) granulated sugar
- ½ cup (100g) light brown sugar
- 3 large eggs, room temperature
- 15 oz canned pumpkin puree
- 2 teaspoons (10ml) vanilla extract
Topping
- ¼ cup (40g) pepitas (pumpkin seeds)
Step-by-Step Instructions
Preparing Your Pan and Oven
Begin by preheating your oven to 350°F (175°C). This gives it plenty of time to reach the proper temperature while you mix your batter. Consistent oven temperature is crucial for even baking and that perfect rise.
Line your 9 x 5-inch loaf pan with parchment paper, creating a sling that extends over two opposite sides of the pan. This overhang acts as handles that make removing the finished loaf incredibly easy—just lift and pull. You can lightly grease the parchment if you want extra insurance against sticking, though it’s not strictly necessary.
Mixing the Dry Ingredients
In your first large mixing bowl, combine the flour, baking soda, baking powder, ground cinnamon, pumpkin spice, and salt. Use a whisk to thoroughly blend these dry ingredients together for at least 30 seconds. This step is more important than it might seem—whisking aerates the flour and ensures the leavening agents and spices are evenly distributed throughout.
Don’t skip this whisking step and just dump everything together later. Uneven distribution of baking soda and baking powder can create dense spots or cause uneven rising. Taking an extra minute to whisk now ensures consistent texture throughout your loaf.
Combining the Wet Ingredients
In your second large bowl, pour in the oil along with both the granulated sugar and light brown sugar. Whisk these together vigorously for about a minute until the mixture is smooth and the sugars start to dissolve slightly into the oil. The mixture should lighten in color and become well-combined.
Add the eggs one at a time, whisking well after each addition. Room temperature eggs incorporate more easily and create a smoother batter than cold eggs straight from the fridge. If you forgot to take them out ahead of time, place them in a bowl of warm water for 5-10 minutes to take the chill off.
Next, add the entire 15-ounce can of pumpkin puree and the vanilla extract. Whisk everything together until the mixture is completely smooth, uniform in color, and free of streaks. The batter should be thick and silky at this point, with a beautiful orange hue.
Bringing the Batter Together
Pour the dry ingredients into the bowl with the wet ingredients. Using your whisk, fold and stir the mixture together until just combined. You want to see mostly smooth batter with perhaps a few small lumps remaining—that’s perfectly fine. Overmixing at this stage develops too much gluten in the flour, which results in tough, chewy bread instead of the tender texture we’re after.
The batter will be thick but pourable, similar to the consistency of thick pancake batter. If you see obvious pockets of flour, give it a few more gentle stirs, but resist the urge to whisk vigorously until perfectly smooth.
Filling and Topping the Pan
Pour the pumpkin bread batter into your prepared loaf pan. Use a spatula to scrape every last bit from the bowl and spread the batter evenly in the pan. Smooth the top gently with your spatula—it doesn’t need to be perfectly flat since it will rise and dome during baking.
Sprinkle the pepitas evenly over the top of the batter. Press them very gently into the surface so they adhere during baking—this prevents them from all rolling off when you slice the bread later. The seeds will toast beautifully as the bread bakes, becoming crunchy and adding lovely visual appeal.
Baking to Perfection
Place the loaf pan in the center of your preheated oven. Bake for 55-70 minutes, checking at the 55-minute mark. Baking times can vary depending on your oven, the material of your pan, and even your altitude, so it’s important to test for doneness rather than relying solely on time.
The bread is done when a toothpick or cake tester inserted into the very center comes out with just a few moist crumbs clinging to it. The crumbs should look cooked, not wet with raw batter. The edges of the loaf will also pull slightly away from the sides of the pan, and the top should spring back when lightly pressed.
If the top is browning too quickly but the center isn’t done yet, tent the pan loosely with aluminum foil for the remaining baking time. This protects the top from over-browning while allowing the interior to finish cooking.
Cooling and Removing from Pan
Once baked, remove the loaf from the oven and place the pan on a cooling rack. Let the bread cool in the pan for exactly 15 minutes—this resting time allows the structure to set so the loaf doesn’t fall apart when you remove it.
After 15 minutes, use the parchment paper overhang as handles to lift the entire loaf out of the pan. Transfer it to a wire cooling rack and let it cool completely at room temperature, about one hour. Cooling completely before slicing is crucial—hot bread is too soft and will compress and tear when you try to cut it.
I know it’s tempting to slice into warm pumpkin bread, but patience pays off here. Fully cooled bread slices cleanly and has better texture. If you absolutely must eat it warm, let it cool for at least 30 minutes and use a serrated knife with a gentle sawing motion.
Serving Suggestions
This pumpkin bread is incredibly versatile and delicious in numerous ways. While it’s absolutely perfect enjoyed plain, certain accompaniments and serving methods can elevate it even further.
Classic Serving Ideas
Serve thick slices at room temperature for the full experience of the bread’s tender, moist crumb. The flavors are most pronounced when the bread isn’t cold, and the texture is at its best. Many people enjoy their first slice plain to appreciate the pure pumpkin and spice flavors before trying it with additions.
Toasting transforms the bread into something entirely new. Pop a slice in the toaster until the edges are crispy and golden, then spread with salted butter while it’s still hot. The butter melts into all those nooks and crannies, adding richness that complements the spices beautifully. Cream cheese—plain or cinnamon-flavored—also makes an excellent spread.
For an indulgent breakfast or brunch treat, serve warm slices with maple butter. Simply mix softened butter with pure maple syrup and a pinch of cinnamon. The maple flavor echoes the fall theme while adding sweetness that pairs wonderfully with the pumpkin.
Coffee Shop Style
Create a proper café experience by pairing slices with your favorite fall beverages. Pumpkin bread and a pumpkin spice latte might seem like overkill, but they’re actually a match made in autumn heaven. The warm spices in both complement each other beautifully.
Regular coffee—especially a dark roast—provides a slightly bitter contrast to the sweet bread. Chai tea lattes with their aromatic spices create harmony with the cinnamon and pumpkin spice. Even hot apple cider makes a wonderful non-caffeinated pairing that emphasizes the cozy, autumnal nature of this treat.
Creative Serving Ideas
For a dessert-worthy presentation, warm a slice in the microwave for 10-15 seconds and top with a scoop of vanilla ice cream or whipped cream. The temperature contrast between warm bread and cold ice cream is irresistible, and the vanilla enhances the spices without competing with them.
Create pumpkin bread French toast by dipping thick slices in an egg and milk mixture, then cooking them in butter until golden. Serve with maple syrup and a dusting of cinnamon sugar for an over-the-top breakfast treat. This works especially well with bread that’s a day or two old and slightly dried out.
Recipe Variations
Mini Loaves
This recipe adapts beautifully to mini loaf pans, creating adorable individual-sized breads perfect for gifting. Divide the batter among 4-5 mini loaf pans (approximately 5.5 x 3 inches each), filling each about two-thirds full.
Reduce the baking time significantly to 30-40 minutes, checking at 30 minutes with a toothpick. Mini loaves bake much faster than a full-sized loaf, so watch them carefully to prevent overbaking. These make wonderful gifts wrapped in cellophane with a ribbon, especially during the holiday season.
Muffins
Turn this batter into pumpkin muffins by dividing it among lined muffin tins, filling each cup about three-quarters full. Top each muffin with a few pepitas before baking. Bake at 350°F for 20-25 minutes until a toothpick comes out clean.
Muffins are perfect for grab-and-go breakfasts and portion control. You’ll get approximately 16-18 standard muffins from this recipe. They freeze beautifully individually wrapped, making them ideal for meal prep.
Chocolate Chip Addition
Fold in 1 cup of semi-sweet or dark chocolate chips just before pouring the batter into the pan. The chocolate adds richness and creates pockets of melted chocolate throughout the bread. Alternatively, add both chocolate chips and chopped walnuts or pecans for a more decadent version.
White chocolate chips are another delicious option, though they’re quite sweet. If using them, consider reducing the granulated sugar by 2 tablespoons to maintain balance.
Cream Cheese Swirl
For an elegant variation, create a cream cheese swirl. Beat 8 ounces of softened cream cheese with ¼ cup sugar and 1 egg until smooth. Pour half the pumpkin batter into the pan, dollop the cream cheese mixture over it, add the remaining pumpkin batter, and swirl with a knife.
Bake as directed, adding 5-10 minutes to the baking time since the cream cheese adds density. The tangy cream cheese provides a beautiful contrast to the sweet, spiced pumpkin.
Streusel Topping
Replace the pepitas with a brown sugar streusel topping. Mix ½ cup flour, ⅓ cup brown sugar, ½ teaspoon cinnamon, and 4 tablespoons cold cubed butter until crumbly. Sprinkle over the batter before baking for a crunchy, sweet topping reminiscent of coffee cake.
The streusel creates a delightfully crispy contrast to the tender bread underneath. It does add some extra sweetness, so you might want to reduce the sugar in the bread slightly if you’re sensitive to sweetness.
Make-Ahead Tips
Pumpkin bread is one of those magical baked goods that actually improves after sitting for a day. The flavors meld and deepen, and the texture somehow becomes even more moist and tender.
Baking Ahead
Bake the bread completely and let it cool fully. Wrap the cooled loaf tightly in plastic wrap, then again in aluminum foil or place it in a large freezer bag. The bread will keep at room temperature for up to 5 days, though the pepitas on top will lose some of their crunch after the first day or two.
For longer storage, freeze the wrapped loaf for up to 3 months. Thaw overnight at room temperature, still wrapped, before slicing and serving. The texture remains remarkably good after freezing—you’d never know it wasn’t freshly baked.
Freezing Individual Slices
For maximum convenience, slice the completely cooled bread and wrap individual slices in plastic wrap. Place all the wrapped slices in a freezer bag and freeze. This allows you to remove just one or two slices at a time, perfect for quick breakfasts or snacks.
Frozen slices thaw in about 20-30 minutes at room temperature, or you can microwave them for 20-30 seconds. They also toast beautifully straight from frozen—just add an extra minute or two to the toasting time.
Preparing the Batter Ahead
While you can’t store the unbaked batter (the leavening agents would lose their effectiveness), you can prepare the dry and wet ingredients separately the night before. Store the mixed dry ingredients in a covered bowl at room temperature and the mixed wet ingredients in a covered bowl in the refrigerator.
When you’re ready to bake, let the wet ingredients come to room temperature for about 30 minutes, then combine everything as directed. This prep method makes morning baking much more manageable when you want fresh bread without early morning measuring.
Storage Tips
Proper storage ensures your pumpkin bread stays fresh and delicious for as long as possible. The key is protecting it from air exposure while preventing moisture buildup that could lead to mold.
Room Temperature Storage
For bread you’ll consume within 4-5 days, room temperature storage works perfectly. Place the completely cooled loaf in an airtight container or wrap it tightly in plastic wrap. A bread box also works well, providing protection from air while allowing slight ventilation.
Store the bread in a cool, dry place away from direct sunlight and heat sources. Avoid storing it in the refrigerator unless absolutely necessary—refrigeration actually dries out baked goods faster than room temperature storage.
Refrigerator Storage
If your kitchen is very warm or humid, or if you want to extend the storage time beyond 5 days, refrigerate the wrapped bread. It will keep for up to a week in the fridge. Be aware that refrigeration can slightly dry out the texture, though toasting remedies this beautifully.
Bring refrigerated bread to room temperature before serving, or warm it briefly in the microwave to restore that fresh-baked texture and aroma.
Notes
Always use pure pumpkin puree, not pumpkin pie filling. The difference is crucial—pumpkin pie filling contains added sugars and spices that will throw off the recipe’s balance. Read the label carefully; you want a can that lists only pumpkin as the ingredient.
Room temperature eggs create a smoother batter and better emulsification with the oil. If you forget to take them out ahead, place whole eggs in a bowl of warm (not hot) water for 5-10 minutes.
Different brands of pumpkin spice vary in composition and intensity. If you don’t have pumpkin spice, make your own by combining ½ teaspoon each of ground ginger, nutmeg, and allspice. Some people prefer adding a pinch of cloves as well.
The type of oil you use affects the final flavor. Neutral oils like canola or vegetable oil let the pumpkin and spices shine. Avocado oil adds a subtle richness. Olive oil works but choose light olive oil rather than extra virgin, which can impart too much of its own flavor.
Don’t open the oven door during the first 45 minutes of baking. Sudden temperature changes can cause the bread to sink in the middle. If you need to check for doneness, do so quickly and gently to minimize temperature loss.
FAQ
Why is my pumpkin bread dense and gummy?
Dense, gummy texture usually results from overmixing the batter after adding the flour. Overmixing develops too much gluten, creating a tough, chewy texture. Mix just until the flour disappears—a few small lumps are perfectly fine. Another cause could be underbaking, so make sure to test with a toothpick before removing from the oven.
Can I use fresh pumpkin instead of canned?
While you can use fresh pumpkin puree, canned pumpkin is actually ideal for baking. It has a more consistent moisture content and concentration, ensuring predictable results. Fresh pumpkin puree can be watery and may make your bread too wet. If using fresh, you’ll need to strain out excess moisture through cheesecloth first.
My bread sank in the middle. What happened?
A sunken center usually means the bread wasn’t fully baked, despite passing the toothpick test around the edges. The center needs to reach full doneness to support its own structure. Try baking 5-10 minutes longer next time. Another cause could be opening the oven door too early, causing a sudden temperature drop that makes the bread collapse.
Can I reduce the sugar in this recipe?
You can reduce the sugar slightly—try cutting each type of sugar by 2 tablespoons—but don’t reduce it too much. Sugar doesn’t just sweeten; it also contributes to the bread’s tender texture and moisture retention. Significantly reducing sugar will result in a drier, less tender loaf.
What if I only have one type of sugar?
You can use all granulated sugar or all brown sugar if that’s what you have. Using all granulated creates a slightly lighter color and cleaner sweetness. Using all brown sugar makes the bread darker with a more pronounced molasses flavor. Both work, though the combination specified in the recipe provides the most balanced flavor.
How can I tell if my pumpkin bread is done?
Insert a toothpick or cake tester into the very center of the loaf. It should come out with just a few moist crumbs attached, not wet batter. The edges should pull slightly away from the pan sides, and the top should spring back when lightly pressed. If you’re still unsure, an instant-read thermometer inserted into the center should read about 200-205°F.
Can I make this recipe gluten-free?
Yes, but you’ll need to use a good-quality gluten-free flour blend designed for baking (like Bob’s Red Mill 1-to-1). The texture may be slightly different—often a bit more crumbly—but it should work reasonably well. Avoid single-ingredient gluten-free flours like almond flour or coconut flour, as they require different ratios of wet to dry ingredients.
Why do I need both baking soda and baking powder?
This recipe uses both leavening agents because they serve different purposes. Baking soda reacts with the acidic ingredients (brown sugar has molasses, which is acidic) to create rise and browning. Baking powder provides additional lift and helps create that tender, cake-like crumb. Using both ensures the perfect texture and proper rise.
Prep Time: 10 minutes
Cook Time: 1 hour
Cooling Time: 15 minutes (in pan) + 1 hour (complete cooling)
Total Time: 1 hour 25 minutes (plus cooling)
Course: Breakfast, Dessert, Snack
Cuisine: American
Method: Baking
Nutrition (per serving – 1 slice):
- Serving Size: 1 slice (1/12 of loaf)
- Calories: 285
- Protein: 4g
- Fat: 12g
- Saturated Fat: 1.5g
- Carbohydrates: 42g
- Fiber: 2g
- Sugar: 26g
- Sodium: 220mg
- Cholesterol: 47mg