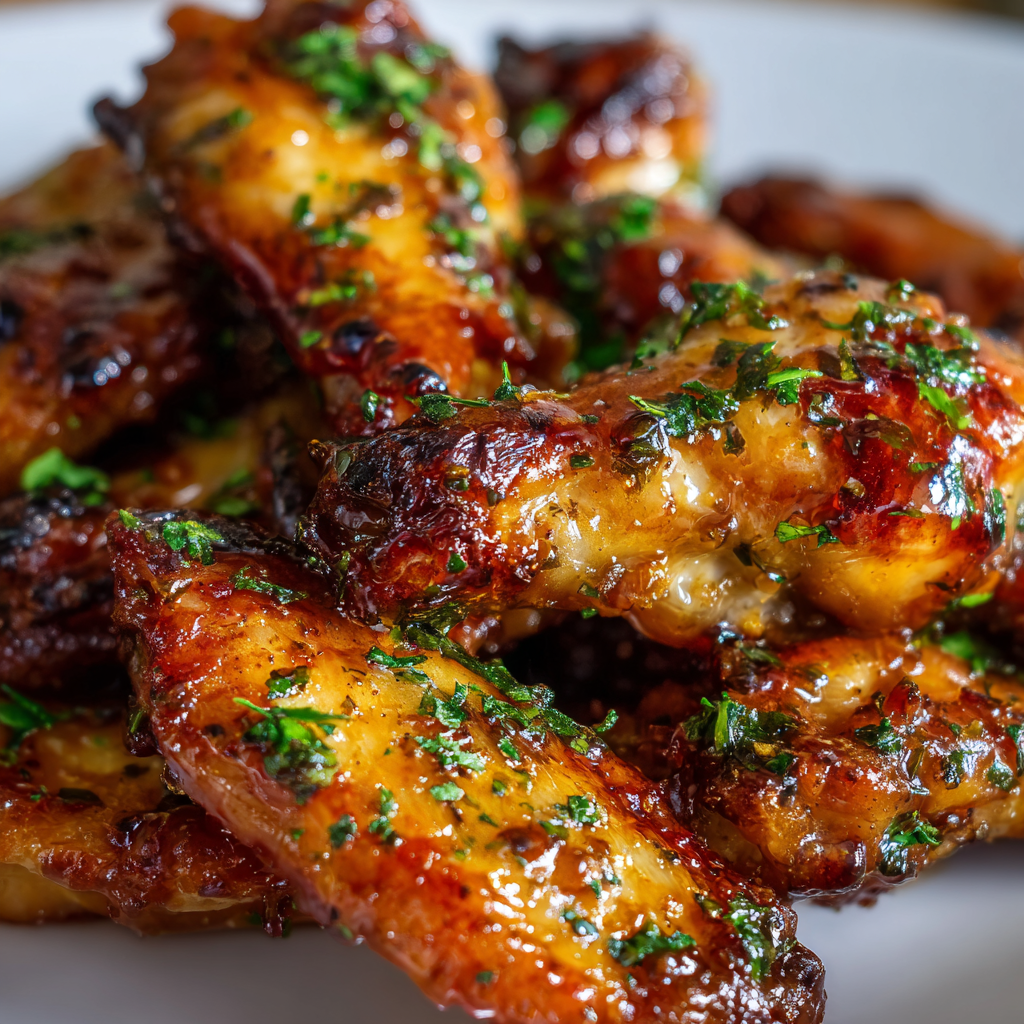
The first time I served these wings at a party, they disappeared so fast I barely got one for myself. That’s when I knew I had a winner on my hands. There’s something irresistible about the combination of sweet pineapple and savory teriyaki that creates this gorgeous, glossy glaze clinging to perfectly crispy wings. Whether you’re hosting game day, throwing a casual backyard gathering, or just treating yourself to something special on a Friday night, these wings deliver restaurant-quality flavor without the fuss. Best of all, they come together in three simple steps that even nervous cooks can master with confidence.
Prep Time: 10 minutes
Cook Time: 40 minutes
Total Time: 50 minutes
Yield: 4 servings
Category: Appetizer
Method: Baking
Cuisine: Asian Fusion
Diet: Low Lactose
Why You’ll Love These Pineapple-Teriyaki Wings
These wings hit that perfect sweet spot between impressive and effortless. Unlike complicated recipes that require multiple pans, special equipment, or advanced techniques, this three-step method keeps things wonderfully simple. You’ll bake the wings first, then brush on the glaze and finish with a final bake—that’s it. The straightforward approach means less stress and fewer dishes to wash afterward.
The flavor profile is absolutely crave-worthy. The natural sweetness from pineapple juice balances beautifully with the umami-rich teriyaki sauce, while honey adds extra stickiness and depth. Fresh garlic and ginger bring aromatic complexity that elevates these wings beyond your typical buffalo or barbecue varieties. Each bite delivers that addictive combination of crispy skin and tender meat coated in a luscious glaze.
Additionally, this recipe is incredibly versatile and crowd-pleasing. The glaze appeals to both adults and kids, offering sweet and savory notes without overwhelming heat. If you’re serving guests with different preferences, you can easily adjust the flavor intensity or add a spicy kick with red pepper flakes.
Finally, these wings are perfect for meal prep and entertaining. They hold up well at room temperature, making them ideal for buffet-style serving. You can even prepare components ahead of time, reducing your day-of workload significantly when you’re expecting company.
Ingredients You’ll Need
Main Components
- 2 lbs chicken wings, split at joints – Look for party-style wings already separated into drumettes and flats
- 1/2 cup pineapple juice – Use 100% juice for the best flavor, not juice cocktail
- 1/3 cup teriyaki sauce – Your favorite brand works perfectly
- 2 tablespoons honey – Adds sweetness and helps create that signature sticky texture
- 1 tablespoon soy sauce – Enhances the savory umami depth
- 1 tablespoon minced garlic – Fresh garlic is worth the extra effort
- 1 teaspoon grated ginger – Fresh ginger provides a bright, zesty note
- 1/2 teaspoon black pepper – Adds subtle heat and complexity
Note: This recipe scales beautifully! Use the 2x or 3x options if you’re feeding a crowd—these wings always go faster than you’d expect.
Step-by-Step Instructions
Step 1: Prepare and Bake the Wings
Begin by preheating your oven to 400°F (200°C). While the oven heats, line a large baking sheet with parchment paper—this prevents sticking and makes cleanup a breeze. Arrange the chicken wings in a single layer on the prepared baking sheet, ensuring they don’t overlap. Crowded wings will steam rather than crisp up properly.
Slide the baking sheet into the preheated oven and bake for 25 minutes, flipping the wings halfway through at the 12-13 minute mark. During this initial baking phase, the skin begins to render its fat and develop that essential crispy texture. You’ll notice the wings starting to turn golden and smell absolutely incredible.
Beginner Tip: Pat the wings dry with paper towels before arranging them on the baking sheet. Removing excess moisture helps achieve crispier skin. If your wings came in a marinade or brine, this step becomes even more important.
Step 2: Create the Pineapple-Teriyaki Glaze
While the wings bake during that initial 25 minutes, prepare your show-stopping glaze. In a medium bowl, whisk together the pineapple juice, teriyaki sauce, honey, soy sauce, minced garlic, grated ginger, and black pepper. Stir thoroughly until the honey dissolves completely and everything combines into a smooth, glossy mixture.
The beauty of this glaze lies in its balanced flavor profile. Give it a taste—you should detect sweetness from the pineapple and honey, saltiness from the soy and teriyaki, and aromatic brightness from the garlic and ginger. If you prefer more sweetness, add another teaspoon of honey. For deeper savory notes, increase the soy sauce slightly.
Beginner Tip: Grating fresh ginger can be tricky. Use the smallest holes on your grater or a microplane, and peel the ginger first. If fresh ginger isn’t available, substitute with 1/4 teaspoon ground ginger, though the flavor won’t be quite as vibrant.
Step 3: Glaze and Finish Baking
Once the wings complete their initial 25-minute bake, remove the baking sheet from the oven. Using a basting brush or spoon, generously coat each wing with the pineapple-teriyaki glaze, making sure to cover all surfaces. Don’t be shy—the more glaze, the stickier and more flavorful your wings will be.
Return the glazed wings to the oven for an additional 15 minutes. During this final baking period, the glaze caramelizes and transforms into that gorgeous, sticky coating everyone loves. The sugars in the pineapple juice and honey create a beautiful lacquered finish that’s almost amber-colored.
For extra-crispy wings with slightly charred edges, turn on your broiler for the final 2-3 minutes of cooking. Watch them carefully during this time—the line between perfectly caramelized and burnt is thin when broiling. The wings are ready when the glaze looks thick and glossy, and the skin has darkened to a rich golden-brown.
Beginner Tip: Reserve about 1/4 cup of the glaze before brushing it on the raw wings. You’ll use this untouched glaze as a dipping sauce, ensuring food safety while giving guests extra sauce for maximum flavor.
Serving Suggestions
These sticky wings shine as the star of any appetizer spread, but thoughtful accompaniments take them to the next level. Serve them on a large platter garnished with fresh pineapple chunks and sliced green onions for a tropical presentation that’s as beautiful as it is delicious.
For sides that complement the sweet-savory profile, consider offering coconut rice, Asian-style coleslaw with sesame dressing, or crispy vegetable spring rolls. Fresh cucumber sticks and carrot spears provide a cool, crunchy contrast to the rich, sticky glaze. A simple mixed green salad with ginger dressing balances the meal nicely.
Don’t forget the dipping sauces! While these wings are incredibly flavorful on their own, offering that reserved pineapple-teriyaki glaze alongside some creamy ranch or spicy mayo gives guests options. Some people love double-dipping their wings for maximum sauce coverage.
For beverages, the tropical sweetness pairs wonderfully with cold beer—particularly wheat beers or light lagers. If you prefer wine, try a slightly sweet Riesling or a crisp Sauvignon Blanc. Non-alcoholic options like coconut water, pineapple juice, or iced green tea complement the Asian-fusion flavors beautifully.
Recipe Variations to Try
Grilled Version
Transform these into summer barbecue stars by grilling instead of baking. Preheat your grill to medium-high heat (around 375-400°F). Grill the wings for 20-25 minutes, turning every 5-7 minutes for even cooking. Once cooked through, brush with the glaze and continue grilling for another 5-10 minutes, basting frequently. The grill adds a wonderful smoky dimension that pairs beautifully with the sweet pineapple notes.
Spicy Kick
If your crowd appreciates heat, transform these wings into a spicy-sweet sensation. Add 1-2 teaspoons of sriracha or sambal oelek to the glaze mixture. Alternatively, sprinkle red pepper flakes over the wings during the final baking stage. For serious heat lovers, serve sliced jalapeños on the side.
Air Fryer Method
Short on time? The air fryer delivers crispy wings even faster. Arrange wings in a single layer in your air fryer basket (work in batches if necessary). Cook at 380°F for 20 minutes, flipping halfway. Brush with glaze and continue cooking for 5-7 minutes until sticky and caramelized.
Protein Swaps
This glaze works magic on other proteins too. Try it with bone-in chicken thighs, pork ribs, or even salmon fillets. Shrimp also takes beautifully to this treatment—just reduce the cooking time to 8-10 minutes total.
Tropical Twist
Amplify the island vibes by adding 1/4 cup of coconut milk to the glaze for extra richness. Garnish the finished wings with toasted coconut flakes and fresh cilantro for a truly tropical experience.
Make-Ahead and Storage Tips
Planning ahead makes entertaining stress-free, and these wings are remarkably prep-friendly. You can complete the initial baking up to 24 hours in advance. Simply bake the wings for that first 25 minutes, then let them cool completely before transferring to an airtight container and refrigerating. When you’re ready to serve, brush with the glaze and complete the final 15-minute bake.
The glaze itself keeps beautifully in the refrigerator for up to a week, making it easy to whip up a batch whenever the craving strikes. Store it in a sealed container and give it a good stir before using, as some separation may occur.
Leftover cooked wings stay fresh in an airtight container for up to 3 days in the refrigerator. Reheat them in a 350°F oven for 10-12 minutes until warmed through and the glaze becomes sticky again. Avoid microwaving if possible, as it can make the skin rubbery rather than crispy.
Freezing Guidelines
While these wings are best enjoyed fresh, you can freeze the cooked, unglazed wings for up to 2 months. Thaw them overnight in the refrigerator, then brush with fresh glaze and bake at 400°F for 15-20 minutes. The texture won’t be quite as crispy as freshly made wings, but they’ll still be delicious.
Important Notes
- Crispier finish: For wings with extra-crispy skin, broil them for the final 2-3 minutes of cooking. Stay close and watch carefully to prevent burning—broilers work fast!
- Grilling option: These wings translate beautifully to the grill, developing a subtle smoky flavor that enhances the sweet-savory profile. Follow the grilling instructions in the variations section above.
- Storage guidelines: Keep leftover wings in an airtight container in the refrigerator for up to 3 days. Reheat gently in the oven rather than the microwave to maintain the best texture.
- Glaze consistency: If your glaze seems too thin, simmer it in a small saucepan for 5-7 minutes to reduce and thicken it before brushing on the wings.
- Food safety: Always ensure wings reach an internal temperature of 165°F. Use a meat thermometer inserted into the thickest part without touching bone for the most accurate reading.
Frequently Asked Questions
Can I use frozen chicken wings?
Yes, but you’ll need to thaw them completely first. Pat them thoroughly dry with paper towels—frozen wings retain lots of moisture that prevents proper crisping. Never cook wings directly from frozen, as they’ll cook unevenly and the texture will suffer. Thaw them overnight in the refrigerator for the best results.
What if I don’t have pineapple juice?
Orange juice makes an excellent substitute with a slightly different citrus profile. You can also use a combination of apple juice and a tablespoon of rice vinegar for sweetness with tang. In a pinch, use crushed pineapple (drained well) blended with a bit of water.
How do I know when the wings are done?
The wings are ready when they reach an internal temperature of 165°F, the skin appears golden and crispy, and the glaze looks thick and glossy. The meat should easily pull away from the bone. When you pick up a wing, the glaze should be sticky but not runny.
Can I make these wings ahead for a party?
Absolutely! Complete the initial 25-minute bake earlier in the day, then refrigerate. About 30 minutes before serving, brush with glaze and complete the final baking. This strategy keeps you out of the kitchen when guests arrive while ensuring fresh-tasting wings.
What’s the best way to get crispy skin?
Start with dry wings—pat them thoroughly with paper towels. Don’t overcrowd the baking sheet, as this causes steaming. Finally, that broiler trick in the last few minutes creates restaurant-quality crispiness. Some cooks also like to dust the wings lightly with baking powder before baking, which helps draw out moisture.
Can I double the glaze for extra saucy wings?
Definitely! If you love extra sauce, make 1.5 or 2 times the glaze recipe. Brush the wings with multiple coats during baking, or serve the additional glaze warm on the side for dipping. The extra glaze keeps refrigerated for a week.
Are these wings kid-friendly?
Most children love these wings because they’re sweet rather than spicy. The flavors are familiar and approachable. If you’re serving very young children, consider cutting the meat off the bones to make eating easier and safer.
Can I use boneless chicken for this recipe?
While traditional wings deliver the best texture and presentation, boneless chicken pieces work too. Use chicken tenders or thigh pieces cut into chunks. Reduce the initial baking time to 15-18 minutes since boneless meat cooks faster, then proceed with glazing and the final bake.
Nutrition Information (Per Serving – 1/4 Recipe)
- Calories: 320
- Protein: 22g
- Carbohydrates: 15g
- Fat: 18g (Saturated: 5g, Unsaturated: 10g, Trans: 0g)
- Cholesterol: 85mg
- Sodium: 850mg
- Sugar: 12g
- Fiber: 0.5g
Did you make this recipe?
Share a photo and tag us — we can’t wait to see your sticky, delicious wings! Your creations inspire us and help other home cooks discover new favorites.