Prep Time: 15 minutes | Cook Time: 10-12 minutes per batch | Yield: 36 mini muffins | Category: Breakfast/Dessert | Method: Bake | Cuisine: American
The Joy of Bite-Sized Fall Baking
Fall baking season is something I wait for all year long. There’s nothing quite like the smell of cinnamon and nutmeg filling up the kitchen on a cool October morning. However, let’s be honest—sometimes you want that cozy fall flavor without making a huge batch of regular-sized muffins that’ll sit on the counter for days.
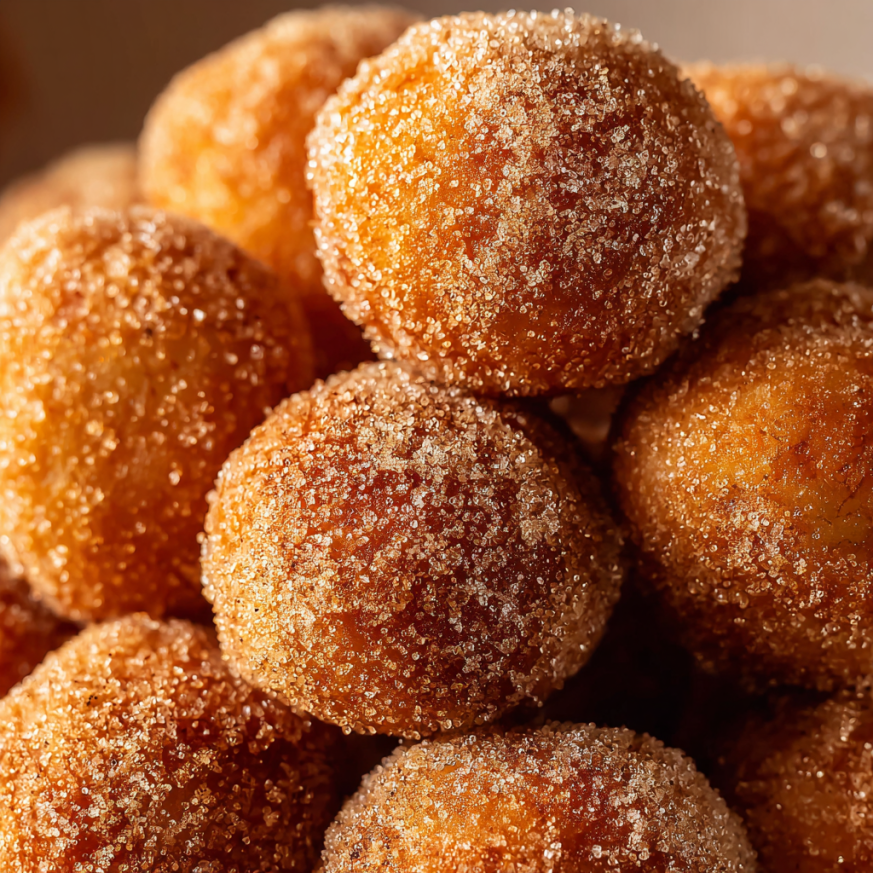
That’s exactly why I fell in love with these Sweet Mini Pumpkin Muffins. Last autumn, I was preparing for my daughter’s school fall festival and needed something portable, adorable, and packed with seasonal flavor. These little gems were born out of that need, and they’ve become a staple in my kitchen ever since. The cinnamon sugar coating transforms them into irresistible little bites of heaven that disappear almost as quickly as they come out of the oven.
What makes these mini muffins so special is their versatility. They’re perfect for everything from breakfast on-the-go to afternoon snacks, party platters, or even tucked into lunchboxes. Plus, their small size means you can enjoy that warm pumpkin spice flavor without the commitment of a full-sized muffin.
Why You’ll Love These Mini Muffins
Perfectly Portioned
One of the biggest advantages of mini muffins is their built-in portion control. Unlike full-sized muffins that can feel like too much for a quick snack, these bite-sized treats give you just enough sweetness to satisfy your craving. Moreover, their small size makes them ideal for entertaining—guests can easily grab a few without feeling guilty.
Quick Baking Time
While regular muffins typically need 18-25 minutes in the oven, these mini versions bake in just 10-12 minutes. This faster baking time means you can have fresh, warm muffins on the table in under half an hour from start to finish. Additionally, the shorter bake time helps ensure your muffins stay incredibly moist and tender.
That Irresistible Cinnamon Sugar Coating
Let’s talk about the real star of this recipe—the cinnamon sugar coating. Each muffin gets dipped in melted butter and then rolled in sweet, spiced cinnamon sugar, creating a delightful crust that adds both texture and flavor. This coating reminds me of the churros I used to eat at county fairs, bringing that same nostalgic sweetness to a classic pumpkin treat.
Crowd-Pleasing Spice Blend
The combination of cinnamon, ginger, allspice, nutmeg, and cloves creates a warm, complex flavor profile that screams autumn. Unlike recipes that rely on pumpkin pie spice, this custom blend allows you to control each individual spice, resulting in a more nuanced and sophisticated taste. Furthermore, the generous amount of pumpkin puree keeps these muffins incredibly moist for days.
Freezer-Friendly Convenience
These muffins freeze beautifully, making them perfect for meal prep or advance planning for holidays and gatherings. Simply freeze them in airtight containers, and you’ll have homemade treats ready whenever you need them. This convenience factor alone makes them worth adding to your regular baking rotation.
Ingredients You’ll Need
For the Muffins
- 1¾ cups all-purpose flour – The foundation for tender muffins
- 1½ teaspoons baking powder – Provides the perfect rise
- 1 teaspoon ground cinnamon – Adds warmth and sweetness
- ½ teaspoon ground ginger – Brings subtle spicy notes
- ½ teaspoon ground allspice – Contributes complexity
- ¼ teaspoon ground nutmeg – Essential for that classic pumpkin flavor
- ¼ teaspoon ground cloves – Adds depth and warmth
- ½ teaspoon salt – Enhances all the other flavors
- 4 tablespoons unsalted butter, melted and slightly cooled – Creates tender crumb
- ½ cup packed light brown sugar – Adds moisture and molasses notes
- ¼ cup granulated sugar – Balances sweetness perfectly
- 1 large egg, at room temperature – Binds ingredients together
- 1 cup canned pumpkin puree – The star ingredient for moisture and flavor
- ½ cup milk, at room temperature – Ensures perfect texture
For the Cinnamon Sugar Coating
- 4 tablespoons unsalted butter, melted – Helps the coating stick
- ½ cup granulated sugar – Creates that sweet crust
- 1 teaspoon ground cinnamon – Adds the signature flavor
Step-by-Step Instructions
Prepare Your Baking Setup
Begin by preheating your oven to 375°F (190°C), allowing it to reach the proper temperature while you prepare the batter. Next, generously grease all 24 wells of your mini muffin pan using butter or non-stick cooking spray. Don’t skip this step—properly greased wells ensure your muffins release cleanly without sticking or tearing. Having everything ready before you mix the batter creates a smooth, efficient baking process.
Combine the Dry Ingredients
In a medium mixing bowl, whisk together the all-purpose flour, baking powder, ground cinnamon, ginger, allspice, nutmeg, cloves, and salt. Take your time with this step, whisking vigorously for at least 30 seconds to ensure all the leaveners and spices are evenly distributed throughout the flour. This thorough mixing prevents clumps and guarantees every muffin has consistent flavor. Additionally, breaking up any lumps now means you won’t have to overmix later when you combine wet and dry ingredients.
Create the Wet Ingredient Mixture
In a separate large bowl, whisk together the melted and slightly cooled butter with both the light brown sugar and granulated sugar. Beat them together until the mixture becomes smooth and the sugars begin to dissolve slightly. Then, add the room temperature egg, whisking until fully incorporated and the mixture becomes pale and creamy.
Pour in the pumpkin puree and milk, continuing to whisk until everything blends into a homogeneous, smooth mixture. The batter should have a beautiful orange color with no streaks of unmixed ingredients. Making sure your egg and milk are at room temperature prevents the melted butter from solidifying and ensures smooth blending.
Combine Wet and Dry Ingredients
Gradually add the dry ingredient mixture to the wet ingredients, using a rubber spatula or wooden spoon to fold them together gently. Stir just until the last streak of flour disappears—you should still see small lumps in the batter, and that’s perfectly fine. Overmixing develops gluten, which creates tough, dense muffins instead of the light, tender texture we’re aiming for.
I like to use a gentle folding motion toward the end, rotating the bowl as I go to ensure everything gets incorporated without overworking the batter. The entire mixing process should take less than a minute once you add the dry ingredients.
Fill and Bake the First Batch
Using a tablespoon-sized cookie scoop or regular tablespoon, portion the batter evenly into each prepared well of your mini muffin pan. Fill each well about two-thirds full, which allows room for the muffins to rise without overflowing. A cookie scoop makes this process incredibly quick and ensures uniform muffin sizes.
Slide the pan into your preheated oven and bake for 10-12 minutes. Start checking at the 10-minute mark—the muffins are done when they’re lightly golden on the sides and the tops spring back when gently pressed. A toothpick inserted into the center should come out clean or with just a few moist crumbs.
Cool and Prepare for Second Batch
Once baked, allow the muffins to cool in the pan for about 5 minutes. This brief cooling period helps them set up and makes them easier to remove without breaking. Then, carefully transfer them to a wire rack using a small offset spatula or butter knife to loosen them if needed.
Since this recipe yields approximately 36 mini muffins, you’ll need to bake a second batch. After removing the first batch, wipe the pan clean with a paper towel and re-grease all the wells before filling with the remaining batter. Repeat the baking process, maintaining the same time and temperature for consistent results.
Make the Cinnamon Sugar Coating
While your muffins cool to a warm (but not hot) temperature, melt the remaining 4 tablespoons of butter in a small microwave-safe bowl. In a separate shallow bowl, whisk together the granulated sugar and ground cinnamon until evenly combined. This simple two-bowl setup creates an efficient assembly line for coating your muffins.
The timing here is important—you want the muffins to be cool enough to handle but still warm enough that the butter coating will adhere properly. Room temperature muffins won’t absorb the butter as well, resulting in less coating sticking to the surface.
Coat Each Muffin
Working with one muffin at a time, dip the top of each muffin into the melted butter, allowing any excess to drip back into the bowl. Then, immediately roll the buttered top in the cinnamon sugar mixture, turning it to coat evenly. Some people like to dip the entire muffin, but I find coating just the tops creates a nice balance between sweet coating and tender muffin.
Place each coated muffin back on the wire rack as you go. The cinnamon sugar will set as the muffins cool completely, creating a slightly crunchy exterior that contrasts beautifully with the soft, moist interior. This coating step transforms ordinary pumpkin muffins into something truly special.
Serving Suggestions
These Sweet Mini Pumpkin Muffins shine in countless serving scenarios. For a cozy weekend breakfast, arrange them on a platter alongside scrambled eggs, crispy bacon, and fresh fruit. The sweetness of the muffins pairs wonderfully with savory breakfast items, creating a balanced morning meal.
During afternoon gatherings, serve these muffins with hot apple cider, spiced chai lattes, or freshly brewed coffee. Their small size makes them perfect for cocktail parties or baby showers where guests want to sample multiple treats. Additionally, they’re ideal for fall picnics or tailgate parties since they’re easy to transport and don’t require plates or utensils.
For a more indulgent presentation, serve warm muffins with whipped cream cheese mixed with a touch of maple syrup and cinnamon. The tangy cream cheese cuts through the sweetness beautifully. Alternatively, a simple pat of salted butter melted on a warm muffin creates a luxurious treat.
These muffins also make thoughtful homemade gifts. Pack them in decorative tins or cellophane bags tied with autumn-colored ribbons for teachers, neighbors, or friends. Everyone appreciates the gift of fresh-baked goods, especially during the busy holiday season.
Recipe Variations to Try
Chocolate Chip Pumpkin Mini Muffins
Fold ½ cup of mini chocolate chips into the batter just before portioning into the muffin pan. The chocolate adds richness and makes these muffins even more dessert-like. For an extra-special touch, use dark chocolate chips for a sophisticated flavor contrast with the sweet spices.
Streusel-Topped Version
Instead of the cinnamon sugar coating, top each muffin before baking with a simple streusel made from 3 tablespoons flour, 3 tablespoons brown sugar, 2 tablespoons cold butter, and ½ teaspoon cinnamon. Cut the butter into the dry ingredients until crumbly, then sprinkle over the muffin batter. This creates a delightful crunchy topping.
Maple Glazed Pumpkin Muffins
Skip the cinnamon sugar coating and instead whisk together 1 cup powdered sugar, 2 tablespoons maple syrup, and 1-2 tablespoons milk to create a smooth glaze. Dip the cooled muffin tops into this glaze for a sweet, glossy finish that hardens slightly as it sets.
Cream Cheese Filled
For an indulgent surprise, make a simple cream cheese filling by mixing 4 ounces softened cream cheese with 2 tablespoons sugar and ½ teaspoon vanilla. Fill each muffin well halfway with batter, add a small dollop of cream cheese mixture, then top with more batter. These taste like mini pumpkin cheesecakes!
Nutty Crunch
Add ½ cup finely chopped pecans or walnuts to the batter for added texture and nutty flavor. Alternatively, sprinkle chopped nuts on top of the muffins before baking for a decorative finish. Toasting the nuts beforehand intensifies their flavor and adds extra crunch.
Make-Ahead Tips
These mini muffins are excellent for advance preparation, making your busy mornings or party planning much easier. After baking and completely cooling the muffins (but before coating them), store them in an airtight container at room temperature for up to 2 days. When you’re ready to serve, simply warm them slightly in the microwave (about 10-15 seconds) and then proceed with the butter and cinnamon sugar coating.
For longer storage, freeze the uncoated muffins in freezer-safe containers or bags for up to 3 months. Layer them with parchment paper to prevent sticking together. To serve, thaw them at room temperature for about an hour, or microwave individual muffins for 20-30 seconds until warmed through. Then apply the coating as directed in the recipe.
If you prefer to have completely finished muffins ready to grab and go, you can coat them before freezing. However, be aware that the cinnamon sugar coating may lose some of its crunchiness after freezing and thawing. A quick 5-minute refresh in a 300°F oven helps restore some of the texture.
The batter itself doesn’t store well and should be baked immediately after mixing. However, you can measure and combine all the dry ingredients up to a week in advance, storing them in an airtight container. This makes the actual baking process even quicker when you’re ready to make fresh muffins.
Important Notes
Room Temperature Ingredients: Bringing your egg and milk to room temperature before mixing is crucial for several reasons. Cold ingredients can cause the melted butter to solidify into small lumps, creating an uneven texture. Additionally, room temperature ingredients emulsify better, creating a smoother batter that produces more tender muffins.
Don’t Overmix: This cannot be stressed enough—overmixing is the number one cause of tough, dense muffins. Once you add the flour mixture to the wet ingredients, mix only until you no longer see dry flour. Small lumps in the batter are completely normal and will disappear during baking.
Oven Temperature Accuracy: Mini muffins bake quickly, so oven temperature accuracy is essential. If your oven runs hot, they’ll brown too quickly on the outside while remaining raw inside. Conversely, a too-cool oven produces pale, dry muffins. Consider using an oven thermometer to verify your actual temperature.
Proper Greasing: Even with non-stick pans, generous greasing is important for mini muffins. Their small size means they have proportionally more surface area touching the pan, making them more likely to stick. Use butter, cooking spray, or even brush the wells with vegetable oil.
Cinnamon Sugar Timing: The coating adheres best when muffins are warm but not hot. If they’re too hot, the butter will cause the coating to slide off. If they’re too cool, the butter won’t absorb properly. Aim for warm to the touch—you should be able to hold them comfortably.
Storage Guidelines: Store coated muffins in an airtight container at room temperature for up to 3 days. The cinnamon sugar coating will soften slightly over time, but the muffins remain delicious. For longer storage, freezing is your best option.
Estimated Nutrition Information
For the complete recipe (approximately 36 mini muffins):
- Calories: 1,600-1,750
- Protein: 20-24g
- Fat: 45-52g
- Carbohydrates: 300-325g
Per individual mini muffin (approximate):
- Calories: 45-50
- Protein: 0.5-0.7g
- Fat: 1.3-1.5g
- Carbohydrates: 8-9g
These values are estimates and do not include optional ingredients or variations. The cinnamon sugar coating contributes approximately 15-20 calories per muffin.
Frequently Asked Questions
Can I use fresh pumpkin puree instead of canned?
Absolutely! Fresh pumpkin puree works wonderfully in this recipe. However, homemade puree tends to be more watery than canned, so you may need to drain it first. Place the puree in a fine-mesh strainer lined with cheesecloth and let it drain for 30 minutes, pressing occasionally to remove excess liquid. You want a thick, paste-like consistency similar to canned puree.
Why are my muffins dense instead of fluffy?
Dense muffins usually result from overmixing the batter. When you overmix, you develop the gluten in the flour, creating a tough, dense texture. Additionally, using expired baking powder or packing the flour too tightly when measuring can cause density issues. Always spoon flour into your measuring cup and level it off rather than scooping directly from the bag.
Can I make these in a regular-sized muffin pan?
Certainly! This recipe will yield approximately 12-14 regular-sized muffins. Increase the baking time to 18-22 minutes, checking for doneness with a toothpick inserted into the center. The muffins should spring back when lightly pressed and have golden-brown edges.
My muffins stuck to the pan—what went wrong?
Sticking usually indicates insufficient greasing or removing the muffins before they had adequate cooling time. Make sure to coat every surface of each well generously with cooking spray or butter. Additionally, letting the muffins cool for 5 minutes allows them to set up and release more easily from the pan.
Can I reduce the sugar in this recipe?
While you can reduce the sugar slightly, keep in mind that sugar doesn’t just provide sweetness—it also contributes to moisture, texture, and browning. Reducing the sugar in the muffins by more than 25% may result in drier, less tender muffins. The cinnamon sugar coating is optional, so you can skip it entirely if you prefer less sweetness.
Do I need to use all those different spices?
The combination of five spices creates a complex, well-rounded flavor profile that elevates these muffins beyond basic pumpkin treats. However, if you’re in a pinch, you can substitute 2½ teaspoons of pumpkin pie spice for all the individual spices listed. The flavor will be slightly different but still delicious.
How do I know when the muffins are done?
Mini muffins bake quickly, so start checking at 10 minutes. Look for lightly golden edges and tops that spring back when gently pressed. A toothpick inserted into the center should come out clean or with just a few moist crumbs—not wet batter. Overbaking results in dry muffins, so pull them as soon as they’re done.
Can I make these dairy-free?
Yes! Replace the butter with melted coconut oil or a dairy-free butter substitute, and use your favorite non-dairy milk (almond, oat, or soy all work well). The coating can also be made with coconut oil instead of butter. The texture will be slightly different but still delicious.
Why do my muffins have peaked tops instead of flat ones?
Peaked tops usually occur when the oven temperature is too high, causing the outside to set before the inside finishes rising. Additionally, overfilling the muffin wells can cause peaked tops. Fill each well only about two-thirds full for the most even rise and attractive appearance.