I’ll never forget the first time I attempted to recreate the perfect steak I’d enjoyed at an upscale steakhouse. Armed with confidence and a beautiful cut of beef, I watched in horror as my expensive ribeye turned into an overcooked, tough disappointment. That failure sparked a years-long quest to master the art of pan-searing steak at home, and after countless attempts, adjustments, and revelations, I finally cracked the code.
Now, when friends taste my steaks, they immediately ask, “How did you get this so perfect?” The secret isn’t just one technique—it’s a combination of timing, temperature control, and understanding how heat transforms this incredible cut of meat. Once you master these fundamentals, you’ll never need to leave home for a restaurant-quality steak again.
Why This Recipe Will Transform Your Steak Game
Restaurant-Quality Results at Home
This method delivers the same golden, caramelized crust and juicy, perfectly cooked interior that you’d expect from a high-end steakhouse. The key lies in understanding heat management and the science behind proper searing.
Foolproof Technique for Beginners
While the process might seem intimidating, this recipe breaks down each step into manageable techniques that even novice cooks can master. The visual and tactile cues ensure success every time.
Cost-Effective Luxury
Creating steakhouse-quality results at home means enjoying premium dining experiences without the premium price tag. One perfectly cooked steak at home costs a fraction of what you’d pay at a restaurant.
Impressive Entertaining Option
Few things impress dinner guests like a perfectly executed steak. This technique gives you the confidence to serve restaurant-quality food that will have everyone asking for your secrets.
Essential Ingredients
The Star of the Show
- 10 oz scotch fillet (ribeye), room temperature – The marbling in this cut ensures flavor and tenderness
- Flaky sea salt and cracked black pepper – Essential for building that perfect crust
High-Heat Cooking Essentials
- 2 tablespoons olive or avocado oil – Choose oils with high smoke points for proper searing
- 6 tablespoons butter – Creates the luxurious basting sauce that elevates the steak
Aromatic Flavor Builders
- 2 sprigs fresh rosemary – Adds earthy, pine-like notes to the butter
- 2 sprigs fresh thyme – Contributes subtle floral complexity
- 4 garlic cloves, smashed – Releases maximum flavor when crushed
The Science Behind Perfect Steak
Understanding Your Cut
Scotch fillet, known as ribeye in the United States, represents the gold standard for pan-searing. The beautiful marbling of fat throughout the meat serves a crucial purpose—as it cooks, this fat melts and bastes the steak from within, creating unparalleled tenderness and flavor. Unlike leaner cuts that can easily become tough, the natural fat content in ribeye provides a buffer against overcooking.
Temperature Preparation
Bringing your steak to room temperature isn’t just a suggestion—it’s essential for even cooking. Cold steak straight from the refrigerator will cook unevenly, with the exterior overcooking before the center reaches the desired temperature. Allow at least one hour for this crucial step.
Step-by-Step Perfection
The Pre-Cooking Ritual
Remove your steak from the refrigerator exactly one hour before cooking. Immediately season generously with flaky sea salt, allowing it to penetrate the meat while the steak warms. This dual process—temperature adjustment and salt penetration—creates the foundation for exceptional results.
Just before cooking, add a generous coating of freshly cracked black pepper to both sides. Some chefs prefer to add pepper after cooking to prevent burning, but the slight char adds complexity that enhances the overall flavor profile.
Achieving the Perfect Sear
Heat your cast iron pan over high heat until you see a light haze rising from the surface—this visual cue indicates the pan has reached the optimal searing temperature. Add your high-smoke-point oil and swirl to coat the bottom evenly.
The moment your steak hits the pan, you should hear an immediate, aggressive sizzle. This sound tells you the Maillard reaction has begun—the chemical process that creates the golden, caramelized crust that makes great steak extraordinary.
The Critical First Flip
Resist every urge to move, poke, or adjust the steak for the first 2 to 2.5 minutes. This patience allows the crust to develop properly. When you finally flip the steak, you should see a beautiful golden-brown surface with deep caramelization.
Cook the second side for exactly 2 minutes, then begin the basting process that transforms good steak into greatness.
The Basting Technique
After the steak has cooked for 45 to 60 seconds on the second side, add the smashed garlic, butter, rosemary, and thyme to the pan. Watch as the butter melts and begins to foam, creating an aromatic bath for your steak.
Tilt the pan slightly away from you and use a spoon to continuously baste the steak with the foaming butter mixture. This technique not only adds incredible flavor but also helps ensure even cooking throughout the meat.
Temperature and Doneness Guide
Understanding Doneness by Touch
The most reliable way to judge doneness is through touch, not time. Press the center of the steak gently with your finger—for medium-rare, it should feel soft with a slight bounce, similar to pressing the fleshy area at the base of your thumb when you make an “OK” sign with your hand.
Visual Cues for Success
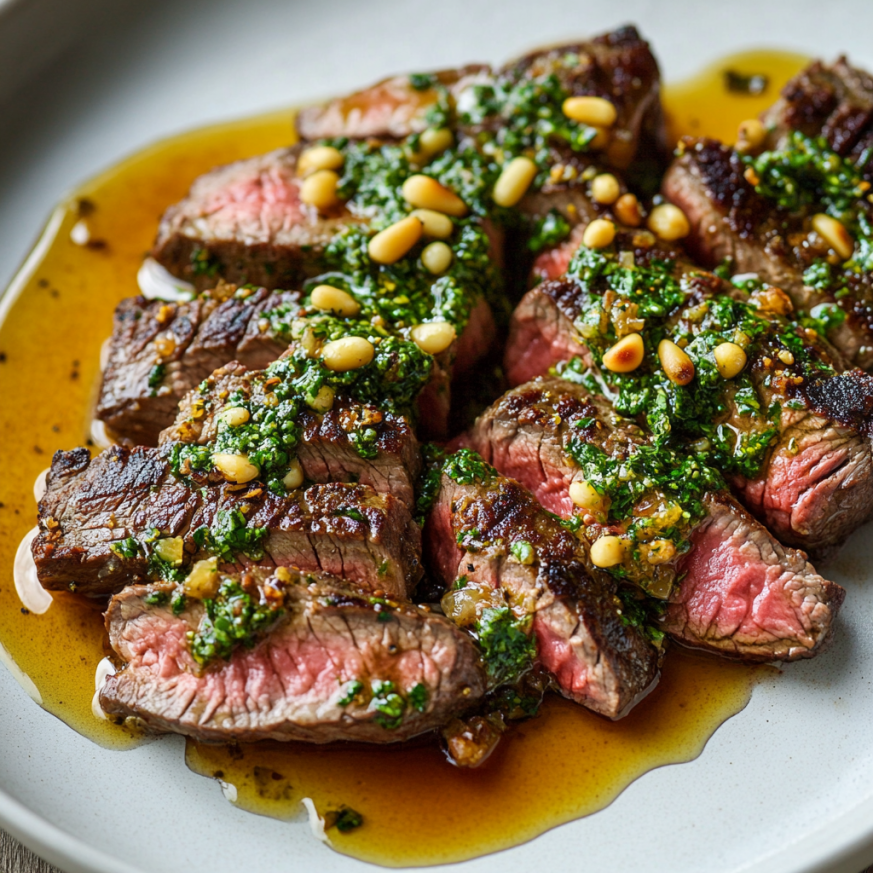
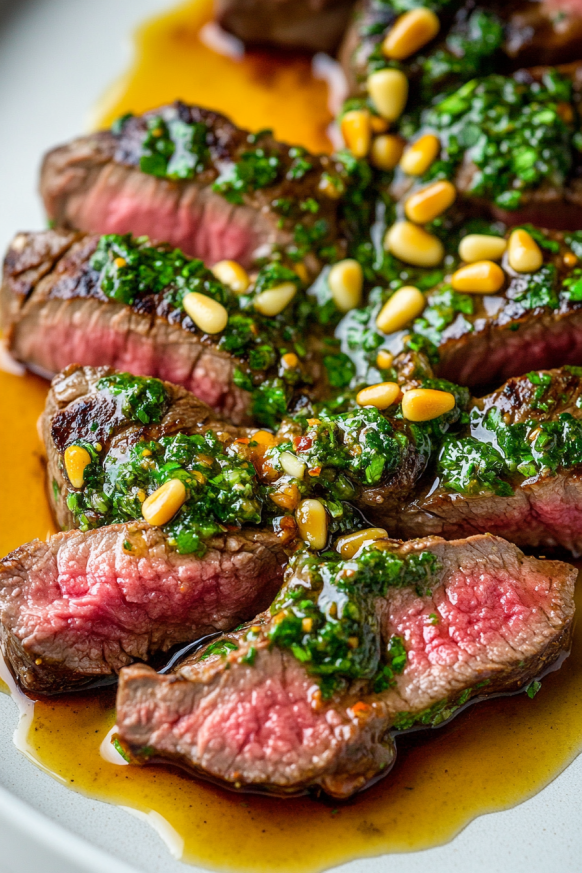
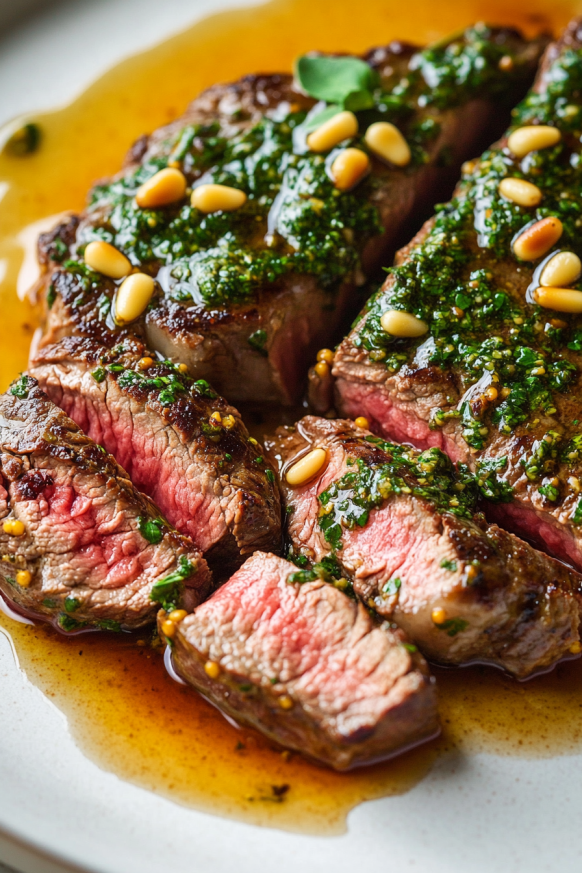
A properly cooked medium-rare steak will have warm red center with a hint of pink throughout. The exterior should display a deep, even crust with no gray band between the crust and the pink interior.
Internal Temperature Guidelines
While touch is preferred, an instant-read thermometer can provide backup confirmation. For medium-rare, aim for 130-135°F (54-57°C) in the thickest part of the steak.
The Crucial Resting Period
Why Resting Matters
Resting isn’t optional—it’s where the magic happens. During cooking, the muscle fibers contract and push juices toward the center. Resting allows these fibers to relax and reabsorb the juices, ensuring every bite is perfectly moist.
Proper Resting Technique
Transfer the steak to a cutting board and pour any remaining butter mixture over the top. Tent loosely with foil if desired, but avoid wrapping tightly, which can steam the crust and compromise its texture.
Allow 5 to 10 minutes of resting time—this patience will be rewarded with noticeably juicier results.
Serving Suggestions
Classic Steakhouse Pairings
Serve your perfect steak alongside crispy roasted potatoes, creamed spinach, and a simple green salad. The rich, buttery steak pairs beautifully with these traditional accompaniments.
Modern Presentation Ideas
For a contemporary approach, slice the steak and arrange it over arugula with roasted cherry tomatoes and a drizzle of balsamic reduction. The peppery greens provide a fresh contrast to the rich meat.
Wine Pairing Excellence
Bold red wines like Cabernet Sauvignon or Malbec complement the rich, beefy flavors perfectly. For those preferring white wine, a full-bodied Chardonnay can work surprisingly well with the buttery elements.
Recipe Variations
Herb-Crusted Version
Before searing, press a mixture of chopped fresh herbs, garlic, and breadcrumbs onto the steak’s surface. This creates an additional layer of flavor and texture while maintaining the core technique.
Coffee-Rubbed Steak
Create a dry rub using finely ground coffee, brown sugar, paprika, and chili powder. The coffee adds earthy complexity that pairs beautifully with the beef’s natural flavors.
Blue Cheese Butter Finish
Compound butter made with blue cheese, chives, and garlic creates an indulgent finishing touch that melts over the warm steak for restaurant-level luxury.
Make-Ahead Strategies
Preparation Timeline
Season your steak with salt up to 24 hours in advance and store it uncovered in the refrigerator. This extended salting period, called dry-brining, enhances flavor penetration and improves texture.
Compound Butter Preparation
Make flavored compound butter days ahead by mixing softened butter with herbs, garlic, and seasonings. Roll in parchment paper and refrigerate until firm, then slice medallions as needed.
Side Dish Coordination
Prepare your side dishes first, keeping them warm while you cook the steak. This ensures everything comes together at the optimal temperature for serving.
Professional Tips
Pan Selection Matters
Cast iron pans retain and distribute heat most effectively, creating the ideal searing environment. However, a heavy-bottomed stainless steel pan works well too. Avoid non-stick pans, which can’t achieve the high temperatures necessary for proper searing.
Oil Selection Strategy
Choose oils with high smoke points like avocado oil, grapeseed oil, or light olive oil. Regular extra virgin olive oil will smoke and burn at the high temperatures required for proper searing.
Butter Timing
Add butter only after the initial sear to prevent burning. Butter has a lower smoke point than oils, so introducing it during the basting phase provides flavor without compromising the cooking process.
Troubleshooting Common Issues
Gray Band Around the Meat
This usually indicates the steak was cooked straight from the refrigerator or the heat was too low. Always bring steak to room temperature and ensure your pan is properly preheated.
Tough, Chewy Results
Insufficient resting time or overcooking typically causes this problem. Use the touch test to gauge doneness and always allow proper resting time.
Lack of Crust Development
Low heat or moving the steak too early prevents proper crust formation. Ensure your pan is smoking hot and resist the urge to flip too soon.
Frequently Asked Questions
How do I know when my pan is hot enough?
Look for a light haze or smoke rising from the pan’s surface. You can also test by sprinkling a few drops of water—they should immediately sizzle and evaporate.
Can I use a different cut of steak?
While ribeye is ideal, strip steak or tenderloin work well with this method. Adjust cooking times based on thickness, but the technique remains the same.
What if I don’t have fresh herbs?
Dried herbs can substitute, but use about one-third the amount. Add them to the butter mixture to help release their flavors more effectively.
How do I prevent my smoke alarm from going off?
Ensure good ventilation by turning on your exhaust fan and opening windows if necessary. The high heat required for proper searing will create some smoke.
Can I finish the steak in the oven?
For thicker steaks, you can transfer the pan to a 400°F oven after searing to finish cooking. This technique works particularly well for steaks over 1.5 inches thick.
What’s the best way to slice the steak?
Always slice against the grain at a slight angle. This breaks up the muscle fibers and makes each bite more tender.
How do I reheat leftover steak?
Gently warm sliced steak in a low oven (250°F) for just a few minutes. Avoid microwaving, which will overcook the meat and compromise texture.
Prep Time: 1 hour 10 minutes | Cook Time: 5 minutes | Total Time: 1 hour 15 minutes | Serves: 1-2 people
Nutrition Information (per serving): 623 calories, 68g fat, 2g protein, 5g carbohydrates


