
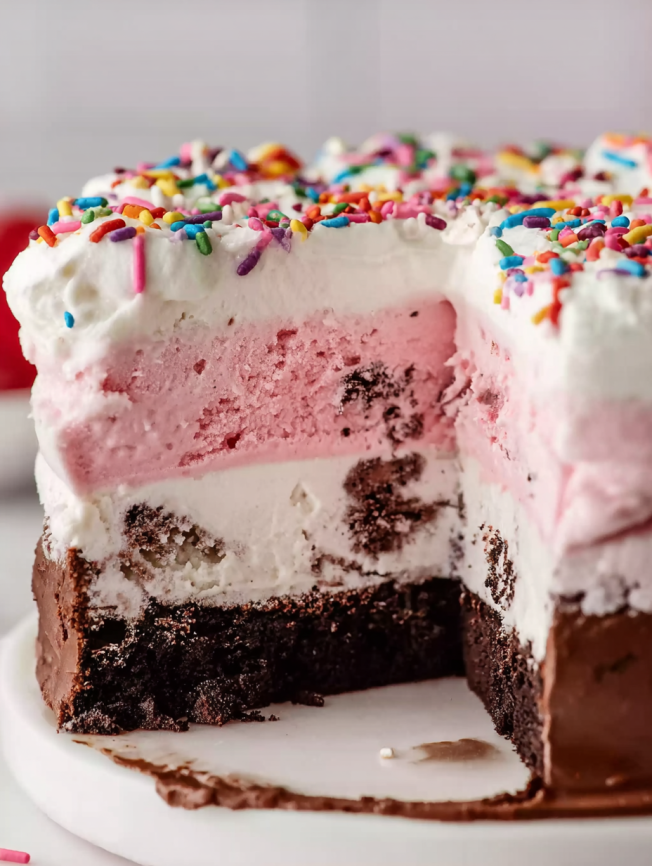
Growing up, ice cream cakes were reserved for the most special occasions – birthdays that ended in zero, graduations, and those rare summer celebrations that called for something extraordinary. However, I discovered that creating these impressive desserts at home is surprisingly achievable and infinitely more satisfying than store-bought versions. The first time I assembled layers of my favorite ice cream flavors with crunchy cookie crumbs and silky hot fudge, I realized I’d never go back to expensive bakery versions again.
This recipe transforms your kitchen into a professional ice cream parlor, allowing you to customize every single layer according to your family’s preferences. Whether you’re celebrating a milestone birthday or simply want to elevate a summer gathering, this show-stopping dessert delivers both visual impact and incredible taste.
Why This Ice Cream Cake Will Become Your Go-To Celebration Dessert
Creating homemade ice cream cake offers complete control over flavors, quality, and presentation. Unlike commercial versions loaded with artificial ingredients, your homemade creation showcases premium ice cream flavors complemented by real whipped cream and rich hot fudge.
Customization Freedom Choose any ice cream combination that speaks to your taste buds. Furthermore, the layering technique works beautifully with both classic and adventurous flavor pairings. From traditional chocolate and vanilla to exotic combinations like lavender honey and salted caramel, possibilities are endless.
Make-Ahead Convenience This dessert actually improves with time, making it perfect for party planning. Additionally, most components can be prepared days in advance, reducing last-minute stress when entertaining. The freezing process allows flavors to meld beautifully while maintaining perfect texture.
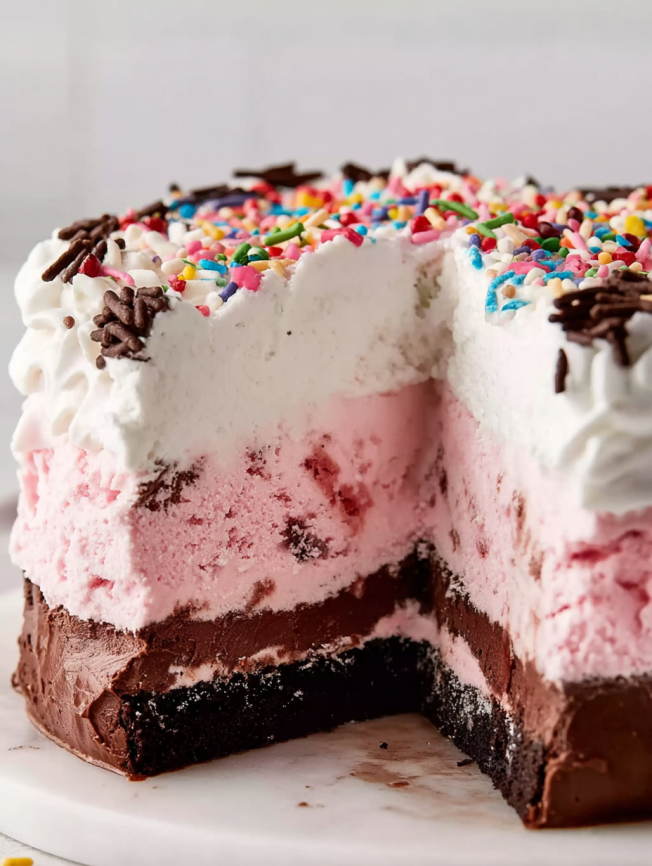
Professional Presentation Despite its impressive appearance, this cake requires no special decorating skills. Moreover, the natural layers create stunning visual appeal, while whipped cream frosting provides an elegant finishing touch that rivals any bakery creation.
Essential Ingredients and Components
Ice Cream Cake Foundation
- 10 Oreo cookies (110g), including cream filling
- 2 tablespoons (28g) unsalted butter, melted
- 1.5 quarts (1.42L) chocolate ice cream, softened (or your preferred bottom layer flavor)
- 1 cup (227g) homemade hot fudge sauce, divided (store-bought works too)
- 1.5 quarts (1.42L) strawberry ice cream, softened (or your preferred top layer flavor)
Whipped Cream Topping
- 2 cups (480ml) heavy cream, cold
- ⅓ cup (40g) confectioners’ sugar
- 1½ teaspoons pure vanilla extract
- Colorful sprinkles for garnish (optional)
Equipment Essentials: A 9×3-inch or 10×3-inch springform pan works best, though alternative pan options exist for different serving sizes.
Step-by-Step Assembly Instructions
Preparing the Cookie Crust Layer
Begin by pulsing Oreo cookies in a food processor until they form coarse crumbs with some larger chunks remaining. This texture provides delightful contrast against smooth ice cream layers. Mix the cookie crumbs with melted butter until evenly moistened, then set aside.
Remove your chosen bottom-layer ice cream from the freezer, allowing it to soften for approximately 10 minutes. Meanwhile, line your springform pan with plastic wrap, using two overlapping pieces to ensure complete coverage with overhang for easy removal later.
Building the Foundation Layer
Working quickly to prevent melting, scoop the softened ice cream into your prepared pan. Use the back of a large spoon to spread it into an even layer, reaching all edges. Place the pan in the freezer for 30 minutes to firm up before adding the next component.
During this freezing period, prepare your hot fudge sauce or warm store-bought sauce to achieve a spreadable consistency. Temperature control is crucial – the sauce should flow easily but not be so hot that it melts the ice cream beneath.
Creating the Middle Layers
Once the bottom ice cream layer has firmed, spread half the hot fudge sauce evenly across the surface. Next, distribute the prepared Oreo mixture over the fudge layer, creating a crunchy textural element that defines great ice cream cakes.
Return the pan to the freezer for another 30 minutes. During the final 10 minutes of this freezing time, remove your second ice cream flavor from the freezer to begin softening.
Completing the Assembly
Drizzle the remaining hot fudge over the cookie layer, then quickly spread the second ice cream flavor on top. Work efficiently but gently to maintain distinct layers while ensuring even coverage. Cover tightly with plastic wrap or aluminum foil, then freeze for at least 12 hours to achieve optimal firmness.
Serving and Presentation Tips
Preparation for Serving
If planning to serve the cake on a different surface than the springform pan bottom, place your chosen serving plate or cutting board in the freezer for at least 30 minutes beforehand. This prevents immediate melting upon contact with room temperature surfaces.
Whipped Cream Application
Create the whipped cream topping by beating heavy cream, confectioners’ sugar, and vanilla extract until stiff peaks form. This typically takes about 4 minutes with an electric mixer. Apply the whipped cream immediately after removing the cake from its pan.
Professional Finishing Touches Remove the springform pan rim and carefully peel away plastic wrap using the overhanging edges. Spread whipped cream over all surfaces, working quickly to prevent melting. Consider piping decorative borders using a star tip for bakery-quality presentation.
Creative Flavor Combinations
Classic Pairings
Traditional combinations like chocolate and vanilla never disappoint, while strawberry and chocolate create beautiful color contrast. However, don’t hesitate to explore premium flavors like cookies and cream paired with salted caramel.
Seasonal Inspirations
Summer calls for fresh fruit flavors – try peach and vanilla or cherry and chocolate chip. During autumn months, pumpkin spice with cinnamon ice cream creates festive appeal. Winter holidays shine with peppermint and chocolate combinations.
Gourmet Adventures
Elevate your creation with sophisticated pairings like pistachio and dark chocolate, or lavender honey with lemon. Coffee and tiramisu flavors appeal to adult palates, while birthday cake and funfetti satisfy those who love celebratory sweetness.
Make-Ahead Strategies
Timeline Planning
Complete the entire cake assembly up to 48 hours before serving for optimal texture and flavor development. Beyond this timeframe, the cake becomes increasingly difficult to slice cleanly, though extended freezing remains possible with adjusted serving techniques.
Component Preparation
Whipped cream can be prepared up to 24 hours in advance when stored properly in the refrigerator. Additionally, hot fudge sauce keeps well for several days, requiring only gentle rewarming before use.
Storage Solutions
Keep the assembled cake tightly covered in the freezer to prevent ice crystal formation and flavor absorption from other frozen items. Proper wrapping maintains quality and prevents freezer burn.
Important Technical Notes
Pan Selection Guidelines
Springform pans with removable bottoms provide easiest removal and professional presentation. However, alternative options like 9×13-inch rectangular pans work well for larger gatherings, while 8×2-inch square pans suit smaller groups when the recipe is halved.
Ice Cream Softening Tips
Optimal softening allows easy spreading without complete melting. Remove ice cream from the freezer 10 minutes before use, adjusting timing based on your kitchen temperature and ice cream density.
Cookie Alternatives
While Oreos provide classic appeal, numerous cookie options work beautifully. Consider chocolate chip cookies for extra crunch, Nutter Butters for peanut flavor, or graham crackers for s’mores-inspired variations. Avoid homemade cookies, as they typically lack the necessary crispness.
Frequently Asked Questions
How do I cut the cake without making a mess? Use a very sharp knife dipped in hot water between each slice. This technique melts through frozen layers cleanly while preventing cracking. Additionally, let the knife warm completely before each cut for best results.
Can I substitute the ice cream flavors with any combination I prefer? Absolutely! This recipe works with any ice cream flavors you enjoy. Consider complementary flavors that create appealing color contrast, but don’t be afraid to experiment with unexpected combinations that reflect your personal taste preferences.
What should I do if my ice cream gets too soft during assembly? If ice cream becomes too melted during assembly, return it to the freezer for 15-20 minutes before continuing. Working in a cool kitchen helps, and having all components prepared beforehand minimizes handling time.
How long can I store the finished cake in the freezer? While the cake remains safe to eat for several weeks when properly wrapped, optimal texture and flavor last about one week. After this time, ice crystals may form and flavors may diminish, though the cake remains perfectly edible.
Can I make individual mini ice cream cakes instead? Yes! Use muffin tins or small ramekins lined with plastic wrap to create individual portions. Reduce layering proportionally and adjust freezing times to 2-3 hours between layers. Mini cakes make excellent party favors or portion-controlled desserts.
What’s the best way to transport this cake to a party? Keep the cake frozen until the last possible moment, then transport in a cooler with dry ice or frozen gel packs. Plan to serve within 30 minutes of arrival to maintain optimal texture and prevent melting.


