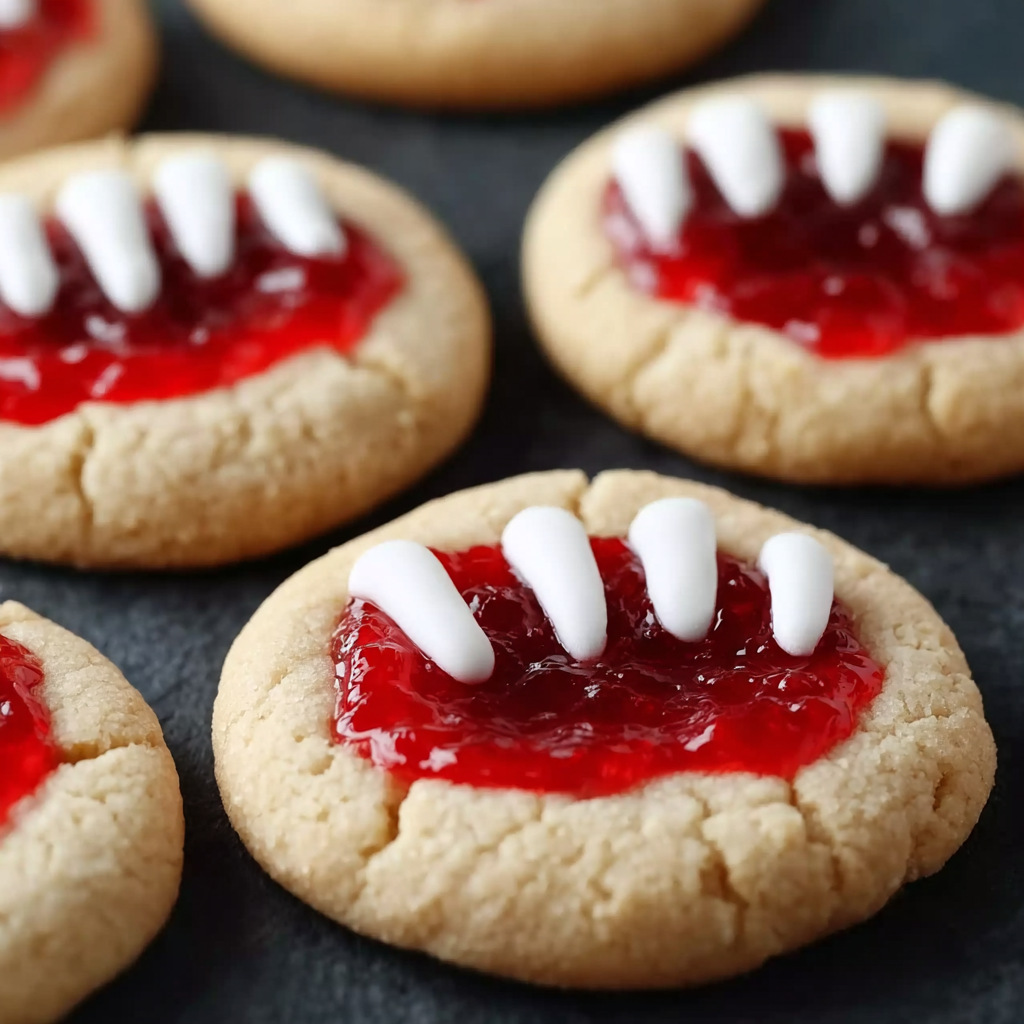
There’s something magical about Halloween that brings out the kid in all of us. Every October, I find myself getting excited about creating treats that are equal parts delicious and delightfully spooky. These Vampire Cookies have become my go-to recipe for Halloween parties, and I love how they never fail to bring smiles (and sometimes playful screams) to everyone who sees them. The combination of chocolatey sweetness with those adorable fangs makes them irresistible to both children and adults alike.
Prep Time: 15 minutes
Cook Time: 12 minutes
Cooling Time: 30 minutes
Total Time: 57 minutes
Servings: 24 cookies
Course: Desserts
Cuisine: American
Calories: 150 per cookie
Why You’ll Love These Vampire Cookies
These spooky treats are incredibly easy to make, even if you’re not an experienced baker. Starting with store-bought cookie dough saves you time without sacrificing flavor, making them perfect for busy Halloween preparations. Additionally, they’re highly customizable, allowing you to adjust the decorations based on dietary needs or creative preferences.
Kids absolutely adore helping with the decorating process, which turns baking into a fun family activity. The cookies themselves are deliciously soft and chewy, while the combination of chocolate, vanilla frosting, and playful decorations creates a perfect balance of flavors. Best of all, they look impressively spooky without requiring any advanced decorating skills.
Ingredients You’ll Need
For the Cookie Base
- 1 tube chocolate chip cookie dough (store-bought or homemade)
For the Frosting
- 1 cup vanilla frosting (or homemade vanilla buttercream)
- 1 tablespoon red food coloring (optional for a bloody effect)
For the Decorations
- 1 cup mini marshmallows (for vampire fangs)
- 1/2 cup slivered almonds (for vampire teeth)
Note: You can substitute slivered almonds with pretzel pieces or frosted corn flakes for a nut-free option.
Equipment
- Oven
- Baking sheets
- Parchment paper
- Wire rack
- Mixing bowls
- Spatula or offset knife for frosting
Step-by-Step Instructions
Preparing and Baking the Cookies
Start by preheating your oven to 350°F (175°C). While the oven warms up, line your baking sheets with parchment paper to prevent sticking and ensure easy cleanup.
Next, shape the cookie dough into 1-inch rounds, rolling them gently between your palms for even sizing. Place these dough balls on the prepared baking sheets, making sure to leave about 2 inches of space between each one to allow for spreading during baking.
Slide the baking sheets into the oven and bake for 10-12 minutes. The cookies are ready when they turn golden brown around the edges while remaining slightly soft in the center. Remember that they’ll continue to firm up as they cool, so avoid overbaking.
Once baked, transfer the cookies to a wire rack and let them cool completely. This cooling step is crucial because warm cookies will melt your frosting, creating a messy (though still tasty) situation.
Assembling Your Vampire Cookies
While your cookies cool, prepare your frosting station. If you’re using red food coloring, divide your vanilla frosting into two portions. Tint one portion with the red food coloring, stirring until you achieve a “bloody” shade that adds to the spooky effect.
When the cookies are completely cool, it’s time to build your vampires. Take one cookie and spread a generous layer of white vanilla frosting on the flat side. Press another cookie on top, flat side down, to create a sandwich. The frosting acts as both glue and a delicious filling.
Adding the Spooky Details
Now comes the fun part that kids especially love! Spread or drizzle the red-tinted frosting on top of each cookie sandwich. You can be as messy or as neat as you like—imperfection adds to the spooky charm.
For the vampire fangs, gently press two mini marshmallows into the frosting near the bottom edge of the cookie. Position them slightly apart to mimic where fangs would naturally sit. Then, carefully insert slivered almonds above and around the marshmallows to create the appearance of a vampire’s toothy grin.
Feel free to get creative with the placement! Some vampires can have crooked teeth, while others might have a more symmetrical smile. The variations make each cookie unique and add character to your Halloween spread.
Serving Suggestions
These Vampire Cookies are perfect for various Halloween occasions. Arrange them on a dark platter or cake stand for maximum spooky impact at parties. They also make excellent additions to Halloween gift bags or trick-or-treat handouts for special visitors.
For an extra festive presentation, surround the cookies with plastic spiders, candy corn, or Halloween-themed napkins. You might even create a “vampire’s lair” display using black fabric, fake cobwebs, and small LED candles.
They pair wonderfully with hot apple cider, pumpkin spice lattes, or simply a cold glass of milk. For adult gatherings, consider serving them alongside coffee or even a dessert wine.
Creative Variations to Try
Flavor Twists
While chocolate chip cookies are classic, you can experiment with different cookie bases. Try using sugar cookie dough for a lighter flavor, or go all-in with double chocolate cookies for extra decadence. Peanut butter cookie dough creates a delicious sweet-and-salty combination that many adults particularly enjoy.
Alternative Decorations
If almonds aren’t available or you’re dealing with nut allergies, white chocolate chips make excellent substitutes for teeth. Pretzel sticks broken into small pieces provide both a nut-free option and a satisfying crunch. Candy corn can also be used creatively to add colorful details.
For the fangs, white candy melts shaped into points offer a different texture and appearance. You could even use small pieces of white fondant molded into custom fang shapes for a more polished look.
Dietary Adaptations
Making these cookies gluten-free is simple with gluten-free cookie dough. Similarly, vegan versions work beautifully with plant-based cookie dough and dairy-free frosting. The decorations remain the same, making dietary accommodations surprisingly easy.
Make-Ahead Tips
Planning ahead makes Halloween prep much less stressful. You can bake the cookies up to three days in advance and store them in an airtight container at room temperature. Just wait to assemble and decorate them until the day before your event.
The frosting can be prepared up to one week ahead if kept refrigerated in an airtight container. Bring it to room temperature and give it a good stir before using to ensure smooth spreading.
Fully assembled and decorated cookies stay fresh for up to two days when stored in a single layer in an airtight container. If you need to stack them, place parchment paper between layers to prevent the decorations from sticking together.
For longer storage, freeze unfrosted cookies for up to three months. Thaw them at room temperature before decorating, and they’ll taste just as fresh as the day you baked them.
Important Notes
The most crucial tip for success is ensuring your cookies are completely cooled before adding any frosting. Warm cookies will cause the frosting to melt and slide off, taking your carefully placed decorations with it. Patience during this step pays off significantly.
Don’t hesitate to get creative with your toppings and decorations! There’s no single “correct” way to make these cookies. Involving kids in the assembly process makes the activity even more enjoyable and creates lasting Halloween memories.
If you’re making these for a party, consider setting up a “decorate your own vampire cookie” station. Provide plain frosted cookies alongside bowls of marshmallows, almonds, and other decorating options. This interactive approach is especially popular with younger guests.
Frequently Asked Questions
Can I use homemade cookie dough instead of store-bought?
Absolutely! Any chocolate chip cookie dough recipe you love will work perfectly. Homemade dough often provides a richer flavor, though store-bought is wonderful for saving time. Just ensure your homemade cookies are similar in size to maintain consistent baking times.
How do I prevent the decorations from falling off?
The key is using enough frosting to act as “glue” for your marshmallow fangs and almond teeth. Press the decorations gently but firmly into the frosting, giving them a slight twist as you set them in place. Allow the frosted cookies to sit for about 15 minutes before moving them so the frosting can set slightly.
What’s the best way to transport these cookies to a party?
Transport them in a single layer in a flat, covered container if possible. If you must stack them, place sheets of parchment or wax paper between layers. For extra security, you can also transport unfrosted cookies and decorate them at your destination.
Can I make these cookies ahead and freeze them?
You can freeze the baked, unfrosted cookies for up to three months wrapped tightly in plastic wrap and stored in freezer bags. However, I don’t recommend freezing fully assembled cookies because the marshmallows and frosting don’t thaw well. Decorate them fresh after thawing the plain cookies.
What if I don’t have red food coloring?
The red “bloody” frosting is optional and purely for visual effect. White frosting alone still looks great and maintains the vampire theme. Alternatively, you could use Halloween-themed sprinkles or edible glitter for decoration instead.
Are there other creative ways to decorate these cookies?
Definitely! Some people add candy eyes above the fangs, use black frosting to draw on eyebrows, or even create little capes using fruit leather. The basic cookie sandwich structure works as a canvas for endless creative possibilities.
How many cookies will one tube of cookie dough make?
A standard 16.5-ounce tube of refrigerated cookie dough typically yields about 24 cookies, which creates 12 vampire cookie sandwiches. If you want more cookies, simply purchase additional tubes or double your homemade recipe.
These Vampire Cookies bring together the perfect combination of easy preparation, delicious taste, and festive fun. Whether you’re hosting a Halloween party, contributing to a school celebration, or simply enjoying the season with your family, these spooky treats are guaranteed to be a hit. The best part? They prove that impressive-looking Halloween desserts don’t require hours of work or professional decorating skills—just a little creativity and a lot of Halloween spirit!