Prep Time: 10 minutes
Chill Time: 1 hour
Total Time: 1 hour 10 minutes
Servings: 8-12 cups
Every Halloween, my kitchen transforms into a spooky dessert lab, and these Zombie Dirt Pudding Cups have become the star of the show. The first time I made them for my niece’s Halloween party, the kids went absolutely wild when they saw those googly-eyed zombies “rising” from the chocolate dirt. What started as a simple no-bake dessert idea quickly became a tradition that even the adults look forward to each year.
There’s something magical about watching little hands dig through layers of crushed Oreos to discover the creamy mint pudding underneath. The combination of textures—crunchy cookie crumbs against smooth, velvety pudding—creates an experience that’s just as fun to eat as it is to look at. Best of all, you don’t need any baking skills or fancy equipment to pull off this showstopper dessert.
Why You’ll Love This Spooky Treat
No baking required means you can whip these up even when your oven is already working overtime with Halloween dinner. As someone who’s juggled multiple party dishes, I appreciate any recipe that doesn’t require preheating or monitoring bake times. Simply mix, layer, and chill—that’s all it takes to create these frightfully delicious cups.
Kid-friendly assembly makes this the perfect recipe to prepare with little helpers. Children love crushing the Oreos (therapeutic for adults too!), and they get a real kick out of creating the zombie faces with candy eyeballs. My own kids have been helping me make these since they were five years old, and it’s become one of our favorite Halloween traditions.
The mint chocolate combination offers a refreshing twist on traditional dirt pudding. Unlike the standard chocolate-on-chocolate version, the cool mint flavor keeps things interesting without being overwhelming. Even guests who claim they’re not mint fans find themselves going back for seconds.
Customizable presentation allows you to serve these in individual cups, mason jars, or even a large trifle bowl. I’ve made them in everything from fancy stemless wine glasses for adult parties to plastic cups for school celebrations. The versatility means you can adapt them to any setting or occasion.
Make-ahead convenience saves your sanity on busy Halloween day. Since these cups actually improve as they sit and the flavors meld together, you can prepare them the night before without sacrificing quality. This means more time for costumes and trick-or-treating, less time stressing in the kitchen.
Ingredients You’ll Need
Main Components
- 18.7 ounce package Mint Oreos (39 cookies) – The star ingredient that provides both the “dirt” and the zombie bases
- 3.3 ounce box instant white chocolate pudding mix – Creates the creamy, smooth base layer
- 2 cups whole milk, chilled – Essential for proper pudding consistency
- 6-8 drops green food color – Transforms the pudding into an eerie, swamp-like hue
- 8 ounce tub Cool Whip, thawed – Adds airiness and makes the pudding extra fluffy
Decorative Elements
- 8-12 large candy eyeballs – For the zombie’s main eyes
- 8-12 small candy eyeballs – Creates that creepy, multi-eyed zombie look
- Bone or skeleton sprinkles – Optional but adds an extra spooky touch
Step-by-Step Instructions
Prepare the Zombie Faces
Start by gently twisting apart 12 Oreo cookies, keeping all the cream filling on one side of each cookie. This requires a delicate touch—you want the white filling to stay completely intact because it becomes the “glue” for your zombie eyeballs. Set these special cookies aside on a clean plate where they won’t get mixed up with the others.
Create the Cookie Crumbs
Place the remaining Oreos into your food processor and pulse until they resemble fine, dark soil. The texture should be similar to wet sand rather than large chunks. If you don’t have a food processor, place the cookies in a sealed plastic bag and crush them with a rolling pin. This method takes a bit more elbow grease, but it works just as well and is actually quite satisfying!
Mix the Pudding Base
Pour the chilled milk into a large mixing bowl, then add the instant pudding mix and green food coloring. Using a whisk, beat the mixture vigorously for about 1-2 minutes until it begins to thicken noticeably. The pudding should coat the back of a spoon when it’s ready. Don’t skip the whisking time—this step is crucial for achieving that perfect creamy consistency.
Fold in the Whipped Topping
Once your pudding has thickened, gently fold in the Cool Whip using a rubber spatula. Use a folding motion rather than stirring to maintain the airy texture of the whipped topping. Continue folding until no white streaks remain and you have a uniform, pale green mixture. The final result should be fluffy, smooth, and almost mousse-like in texture.
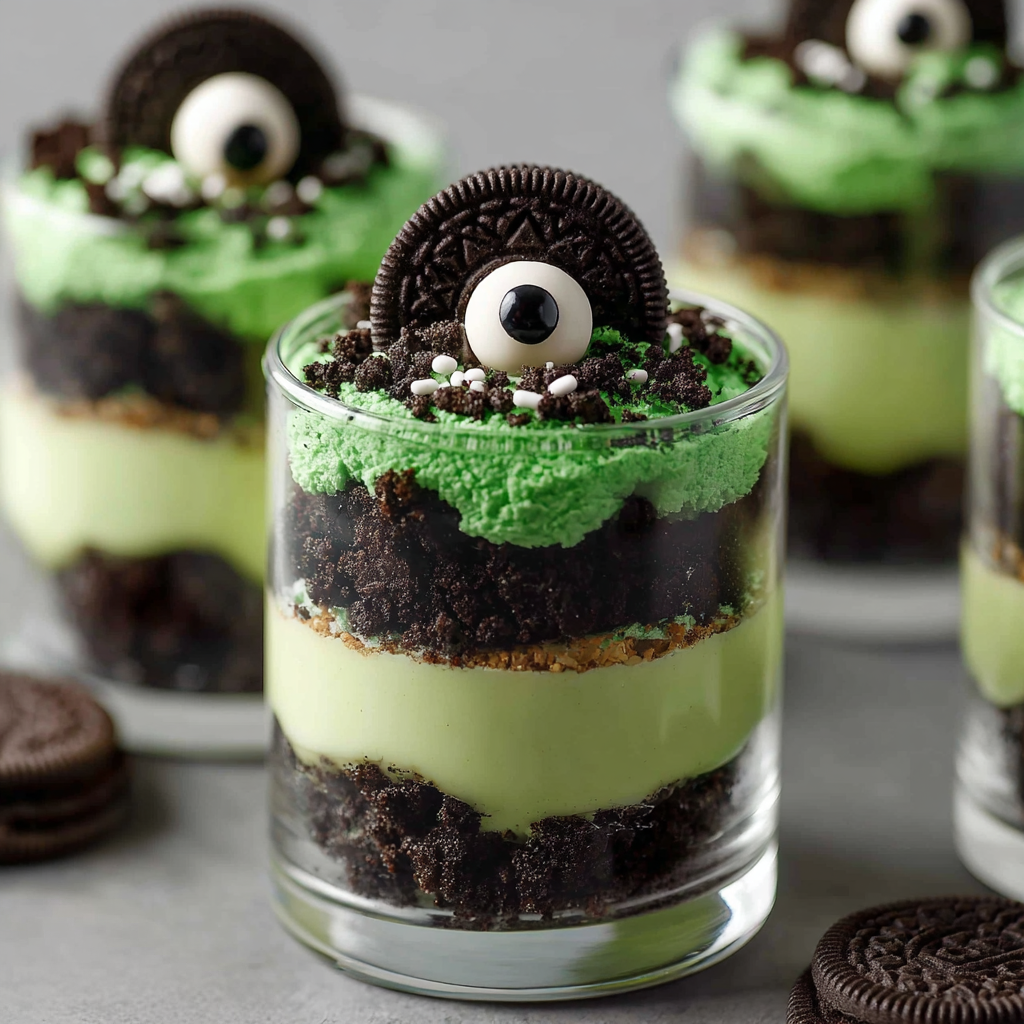
Layer Your Pudding Cups
Begin by sprinkling 1-2 tablespoons of crushed Oreo crumbs into the bottom of each serving glass. Next, add a generous layer of the green pudding mixture on top. Continue alternating between cookie crumbs and pudding, creating 3-4 layers total. Always finish with a layer of crushed Oreos on top to create that authentic “dirt” appearance.
Chill and Set
Cover your assembled pudding cups with plastic wrap and refrigerate for at least one hour. This chilling time allows the pudding to fully set and lets the cookie crumbs soften slightly, creating better texture throughout. Additionally, the mint flavor becomes more pronounced as the dessert chills, making it even more delicious.
Add the Zombie Decorations
When you’re ready to serve, press one large and one small candy eyeball into the cream filling of each reserved Oreo cookie. Position them at slightly different angles to create that authentic zombie look—nothing should be too perfect! Then, gently press these zombie cookies into the pudding so they stand upright, appearing as if they’re rising from the grave. Scatter bone or skeleton sprinkles around the zombies to complete the spooky scene.
Serving Suggestions
These Zombie Dirt Pudding Cups shine at Halloween parties when served alongside other themed treats. I love creating a “graveyard dessert table” with these cups as the centerpiece, surrounded by ghost-shaped cookies and mummy brownies. The visual impact of multiple zombie cups arranged together creates an impressive display that guests always photograph before digging in.
For a more elegant presentation at adult gatherings, serve them in clear wine glasses or small mason jars with decorative handles. The layered effect shows beautifully through the glass, and the portion size feels more sophisticated than plastic cups. Add a striped paper straw in orange and black for an extra festive touch.
Consider setting up a DIY zombie pudding cup station for kids’ parties. Provide the pre-layered cups and let children add their own zombie faces and sprinkles. This interactive element keeps little ones entertained and gives them ownership over their dessert creation.
Pair these pudding cups with hot apple cider or pumpkin spice lattes for the ultimate autumn experience. The cool, minty pudding provides a refreshing contrast to warm, spiced beverages. Alternatively, serve them after a hearty chili dinner—the light, sweet dessert cleanses the palate perfectly.
Recipe Variations to Try
Classic Chocolate Version
Skip the mint Oreos and green food coloring in favor of regular Oreos and chocolate pudding mix. This traditional dirt pudding variation appeals to those who prefer classic flavors over mint. Replace the white chocolate pudding with instant chocolate pudding and use brown food coloring if you want a darker, earthier appearance.
Pumpkin Patch Pudding
Transform these into a fall harvest theme by using vanilla pudding, orange food coloring, and replacing the zombies with candy pumpkins. Crush graham crackers instead of Oreos for a lighter “sandy” texture. This version works wonderfully for Thanksgiving celebrations or autumn birthday parties.
Monster Mash Mix
Create a variety pack by preparing different pudding flavors in separate cups—vanilla, chocolate, and mint. Let each guest choose their favorite flavor combination. This approach works particularly well when serving a crowd with diverse taste preferences.
Vegan-Friendly Adaptation
Use dairy-free pudding mix with almond or oat milk, and replace Cool Whip with coconut whipped cream. Many vegan Oreo varieties exist, making this surprisingly easy to adapt. The texture remains nearly identical to the original version.
Individual Graveyard Scenes
Instead of zombie faces, create entire graveyard scenes using Milano cookies as tombstones, pretzel sticks as fences, and gummy worms peeking through the dirt. This variation requires slightly larger serving containers but creates an even more dramatic presentation.
Make-Ahead Tips
These pudding cups actually taste better when made a day in advance, as the Oreo crumbs soften slightly and the flavors meld together beautifully. Prepare everything except the zombie faces up to 24 hours ahead, keeping the assembled cups covered tightly in the refrigerator. The cookie crumbs will absorb some moisture from the pudding, creating a texture similar to cake.
Store the reserved Oreo cookies separately in an airtight container at room temperature—don’t refrigerate them or they’ll become too soft to stand upright in the pudding. Add the candy eyeballs and insert the zombie cookies just before serving to ensure they maintain their structural integrity.
If you need to transport these to a party, keep them in a cooler with ice packs and add the zombie decorations once you arrive at your destination. The layers hold up remarkably well during transport, though I recommend using cups with lids for extra security.
For longer storage, these cups keep well in the refrigerator for up to three days. However, the cookie crumbs will continue to soften over time, eventually dissolving into the pudding. While this doesn’t affect the taste, it does diminish the textural contrast that makes these cups so enjoyable.
Important Notes
Using whole milk is crucial for achieving the proper pudding consistency. Skim milk or non-dairy alternatives lack the fat content needed for the pudding to set firmly. If you must use a milk substitute, choose one with higher fat content like full-fat coconut milk or oat milk, though results may still vary.
Cool Whip can be replaced with homemade stabilized whipped cream if you prefer. To make stabilized whipped cream, add 1 tablespoon of powdered sugar and 1/2 teaspoon of gelatin per cup of heavy cream. This ensures your whipped cream won’t deflate or separate when mixed with the pudding.
Food coloring intensity varies by brand, so add it gradually until you achieve your desired shade of eerie green. Gel food coloring provides more vibrant color with less product compared to liquid varieties. Start with 4-5 drops and add more as needed.
Serving glass size affects portions significantly. Small cups (4-6 ounces) yield 12 servings and work perfectly for children or party situations. Larger glasses (8-10 ounces) create 8 generous adult-sized portions. Adjust your layering accordingly to avoid running out of pudding mixture.
Frequently Asked Questions
Can I use regular Oreos instead of mint?
Absolutely! Regular Oreos work perfectly well, though you’ll lose the refreshing mint flavor. The recipe will taste more like traditional dirt pudding, which many people actually prefer. You might want to switch to chocolate pudding mix instead of white chocolate to enhance the chocolate-on-chocolate experience.
How far in advance can I make these?
You can prepare these up to 24 hours ahead, which is actually ideal for flavor development. However, don’t add the zombie cookie decorations until just before serving—otherwise, they’ll topple over or become too soft. The pudding mixture can even be made 2-3 days ahead and stored separately from the cookie crumbs, then layered the day before your event.
What if my pudding doesn’t thicken?
This usually happens when you use milk that’s too warm or a milk substitute that’s too thin. Make sure your milk is properly chilled before mixing, and always use whole milk for best results. If your pudding remains thin after whisking for 2 minutes, refrigerate it for 15-20 minutes before adding the Cool Whip. The cold temperature will help it set up properly.
Can I make one large trifle bowl instead of individual cups?
Definitely! A large trifle bowl makes a stunning centerpiece for Halloween parties. Layer the ingredients the same way you would for individual cups, but use the entire batch to create dramatic, visible layers. Create a “zombie graveyard” scene on top with multiple zombie cookies, gummy worms, and extra sprinkles for maximum impact.
Are there nut-free candy eyeball options?
Yes! Most standard candy eyeballs are nut-free, but always check labels if you’re serving guests with allergies. Wilton and other baking supply brands typically offer allergen-free options. Alternatively, you can create eyes using white chocolate chips with a dot of black icing, though they won’t have that fun googly effect.
Why did my layers mix together instead of staying separate?
This can happen if you add too much pudding at once or if your pudding is too thin. Use a gentle hand when adding each pudding layer, spooning it carefully over the cookie crumbs rather than pouring it. The pudding should be thick enough to hold its shape—if it’s runny, refrigerate it for 10-15 minutes before layering.
Can kids help make these?
Absolutely, and they’ll love it! Children can help crush the Oreos (especially fun in a sealed bag with a rolling pin), add food coloring, and create the zombie faces. The layering process is also kid-friendly, though younger children might need help with portion control. This recipe is an excellent introduction to cooking for elementary-aged kids.
Nutrition Information (per serving):
Calories: 452kcal | Carbohydrates: 68g | Protein: 6g | Fat: 18g | Saturated Fat: 8g | Polyunsaturated Fat: 3g | Monounsaturated Fat: 7g | Trans Fat: 0.04g | Cholesterol: 8mg | Sodium: 375mg | Potassium: 278mg | Fiber: 2g | Sugar: 46g | Vitamin A: 121IU | Calcium: 110mg | Iron: 8mg