Start your day with a delightful blend of crunch and creaminess with these Granola Yogurt Cups. They offer the perfect balance of wholesome oats, nutty peanut butter, and natural sweetness, crafted into portable cups that are ideal for busy mornings or quick snacks.
Easy to customize and packed with nutrients, these cups pair wonderfully with your favorite yogurt and fresh fruit, making breakfast both enjoyable and nourishing. The aroma of cinnamon and vanilla adds a comforting touch that makes this simple recipe feel special.
- Simple three-ingredient base that creates a crunchy, flavorful granola cup.
- Quick preparation perfect for busy mornings or an on-the-go snack.
- Highly customizable with yogurt, fresh fruit, and superfood toppings.
- Nut-free and gluten-free options can be easily accommodated by substitution.
Ingredients
- Rolled oats: Use 1 ½ cups of rolled oats as the crunchy, wholesome base full of fiber and nutrients.
- Peanut butter: Half a cup of runny peanut butter binds the granola and adds rich, nutty flavor and protein.
- Maple syrup: ⅓ cup of pure maple syrup provides natural sweetness and helps hold the cups together.
- Vanilla extract: ½ teaspoon enhances the flavor with warm, aromatic notes (optional but recommended).
- Cinnamon: ½ teaspoon adds cozy spice and depth to the granola base (optional but recommended).
- Salt: A pinch enhances flavors and balances sweetness for a well-rounded taste (optional but recommended).
- Yogurt: Your favorite type of yogurt (Greek, plant-based, or regular) to fill the cups, adding creaminess and protein.
- Fresh fruit: Fresh berries, sliced bananas, or diced apples add natural sweetness and vibrant color as a topping.
- Chia seeds: A sprinkle on top for added texture, omega-3 fatty acids, and fiber.
Instructions
- Preheat and Prepare Muffin Pan
-
Preheat your oven to 350ºF and grease 6 muffin pan cavities with coconut oil to prevent sticking. This step ensures easy removal of the granola cups after baking.
- Mix Ingredients Thoroughly
-
In a bowl, combine rolled oats, runny peanut butter, maple syrup, vanilla extract, cinnamon, and salt until well mixed. The sticky mixture will hold its shape once baked, forming sturdy granola cups.
- Shape Granola Cups
-
Divide the granola mixture evenly into the muffin pan cavities. Press the mixture firmly and create a small well in the center of each cup using your fingers or the back of a spoon. This indentation will hold the yogurt and toppings perfectly.
- Bake Until Golden
-
Bake for 12-15 minutes or until edges turn golden brown and the granola cups are firm. The baking process crisps up the cups, providing a satisfying crunch.
- Cool and Remove from Pan
-
Let the cups cool in the pan for 15 minutes to firm up, then carefully run a knife around the edges and transfer them to a wire rack to cool completely. Cooling is essential to keep their shape stable when filled.
- Assemble and Serve
-
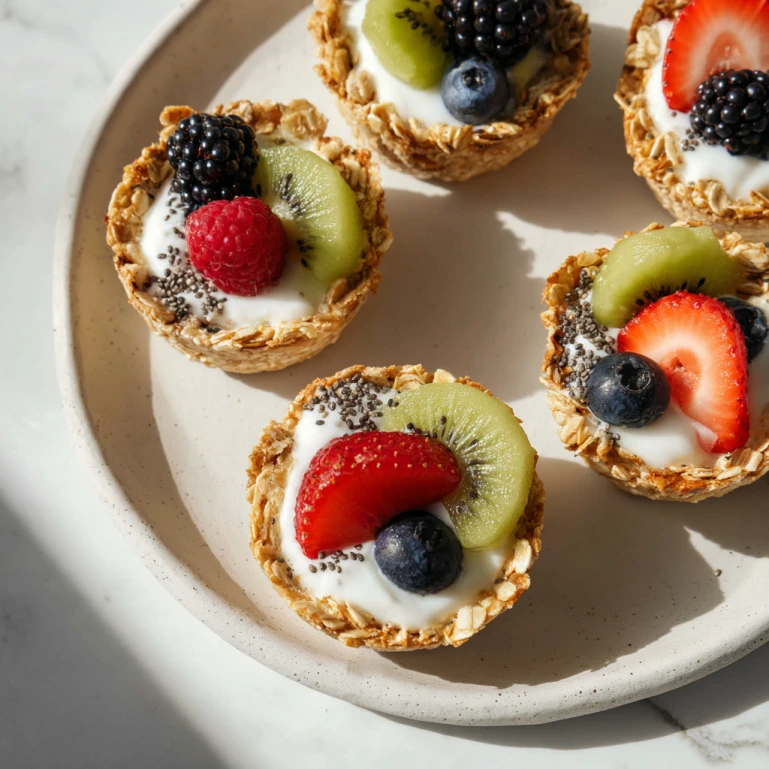
Fill each granola cup with your favorite yogurt and top with fresh fruit and chia seeds. This assembly provides a refreshing contrast between crunchy and creamy textures, and the toppings add extra nutrition and flavor.
- Use runny peanut butter for proper binding; if the peanut butter is thick, warm it slightly to loosen.
- Granola cups can be baked ahead and stored; fill with yogurt just before serving to avoid sogginess.
- Ensure thorough cooling on a wire rack to maintain crispness and ease of handling.
Storage Tips
Store cooled granola cups in an airtight container at room temperature for up to 3 days. For longer storage, refrigerate or freeze them, thawing completely before filling.
Serving Suggestions
Customize your granola cups by topping with dollops of Greek yogurt, plant-based yogurt, or flavored yogurts. Add seasonal fruits like strawberries, kiwi, or mango and sprinkle with nuts or seeds for extra texture and nutrition.
- Press the granola firmly into the muffin pan to create sturdy cups that hold fillings well.
- Try other nut butters like almond or cashew for flavor variations while keeping the same consistency.
- Add mix-ins like shredded coconut, dried fruits, or chocolate chips for flavor complexity and fun twists.
FAQs
- Can I use crunchy peanut butter instead of runny?
-
Runny peanut butter works best as a binder, but crunchy peanut butter can be used if softened slightly by warming to maintain the right texture.
- Are these granola cups gluten-free?
-
Yes, if you use certified gluten-free rolled oats, these granola cups are naturally gluten-free and suitable for sensitive diets.
- Can I make these vegan?
-
Absolutely. Use maple syrup and your preferred plant-based yogurt to keep the recipe vegan while maintaining taste and texture.
- How long do granola cups stay fresh?
-
Stored in an airtight container, they last up to 3 days at room temperature and up to a week refrigerated. Avoid filling with yogurt until right before serving.
- Can I freeze granola cups?
-
Yes, freeze fully cooled granola cups in an airtight container for up to a month. Thaw at room temperature before filling and serving.
- What toppings work best?
-
Fresh fruits like berries, peaches, bananas, and seeds like chia or hemp complement the crunchy granola and creamy yogurt perfectly.

Granola Yogurt Cups
Equipment
- 1 muffin pan greased with coconut oil
- 1 mixing bowl
- 1 wire rack for cooling
Ingredients
- 1 ½ cups rolled oats
- ½ cup runny peanut butter
- ⅓ cup maple syrup
- ½ tsp vanilla extract optional
- ½ tsp cinnamon optional
- pinch of salt optional
- yogurt for topping
- fresh fruit for topping
- chia seeds for topping
Instructions
- Preheat oven to 350ºF and grease 6 muffin pan cavities with coconut oil.
- Combine rolled oats, peanut butter, maple syrup, vanilla extract, cinnamon, and salt in a mixing bowl and stir until well mixed.
- Divide mixture evenly into the muffin pan cavities and press a well into the center of each using fingers or a spoon.
- Bake for 12 to 15 minutes until golden brown. Cool in the pan for 15 minutes, then remove carefully and transfer to a wire rack to cool completely.
- Fill each granola cup with yogurt and top with fresh fruit, chia seeds, or other desired toppings.
Notes
- Use natural peanut butter for best consistency.
- Swap maple syrup with honey if preferred.
- Store leftover cups in airtight container for up to 3 days.
- Customize toppings to suit your taste.


