Three Halloweens ago, I was desperately searching for a dessert that looked impressive but didn’t require hours in the kitchen. That’s when I stumbled upon the magic of Oreo truffles and decided to give them a spooky makeover. My first batch of mummy truffles was such a hit that my neighbor’s kids still ask me every October if I’m making “those mummy ball things” again. The answer is always yes!
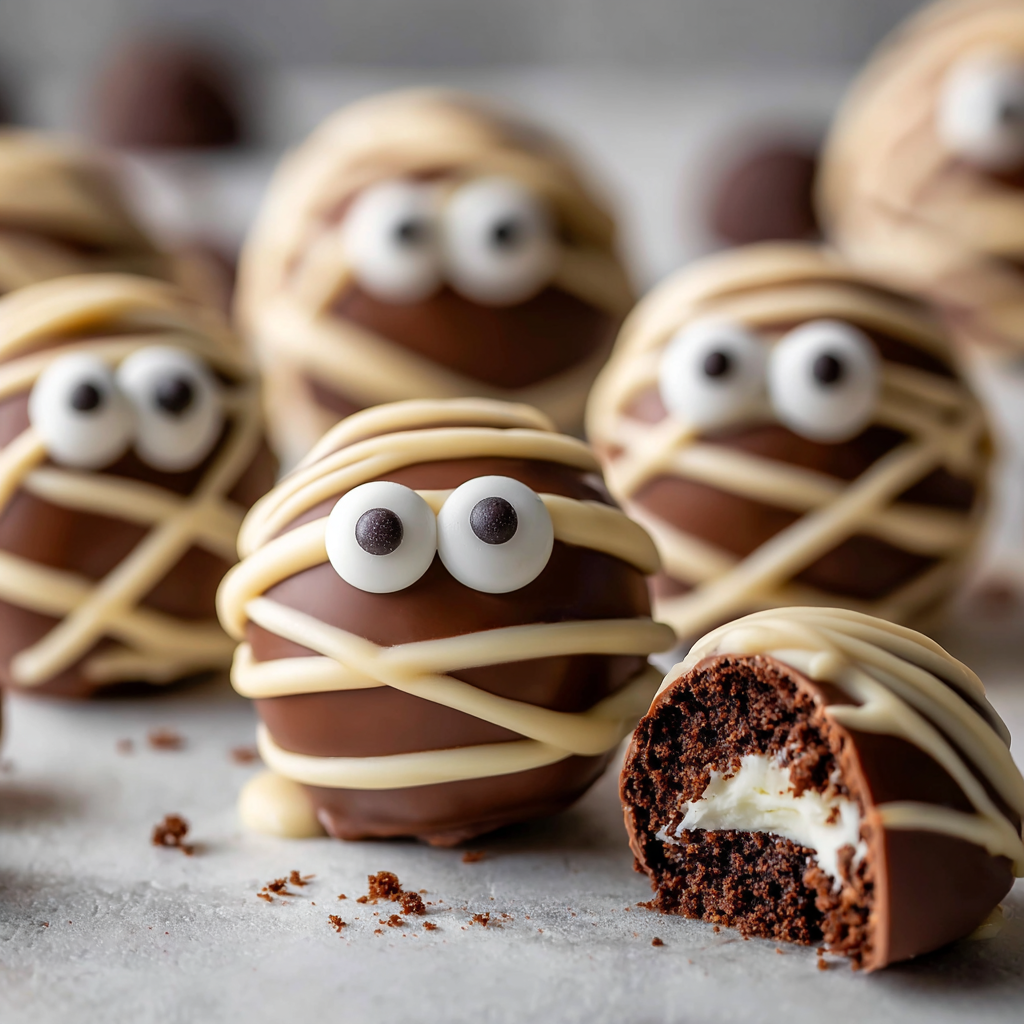
These bite-sized treats combine crushed Oreos with cream cheese to create an irresistibly creamy center, then get wrapped in white chocolate “bandages” for that authentic mummy appearance. What makes them truly special is how they balance being adorably cute with genuinely delicious—no compromise required.
Why You’ll Love These Mummy Oreo Truffles
Incredibly Simple Process – With just four main ingredients and no baking required, these truffles come together quickly even for nervous beginners. The steps are straightforward, and there’s very little that can go wrong.
Crowd-Pleasing Flavor – The combination of Oreos and cream cheese creates a taste similar to cookies-and-cream cheesecake. Even people who aren’t usually fans of overly sweet Halloween candy find these irresistible.
Budget-Friendly Indulgence – A single package of Oreos and minimal additional ingredients yield a generous batch of truffles. Compared to buying fancy Halloween chocolates, these provide much better value while tasting infinitely better.
Perfect Party Size – Each truffle delivers satisfying chocolate flavor in just a few bites. Guests appreciate being able to enjoy something sweet without committing to a full-sized dessert, making these ideal for events with multiple food options.
Customizable Decorating – While the classic mummy design is adorable, you can easily adapt these truffles for different themes or occasions. Once you master the basic technique, the possibilities become endless.
Ingredients You’ll Need
Main Components
Oreos (1 package) – A standard 14.3-ounce package contains approximately 36 cookies, which is exactly what you need. Use regular Oreos rather than Double Stuf for this recipe—the standard filling-to-cookie ratio creates the perfect texture. You can use regular or Golden Oreos depending on whether you want a darker or lighter interior.
Cream Cheese (6 oz) – This binds the crushed Oreos together and adds luscious creaminess. Make sure it’s at room temperature before mixing so it incorporates smoothly without lumps. Block cream cheese works better than whipped varieties, which contain too much air.
White Chocolate Melting Wafers – These specially formulated wafers melt smoothly and set with a beautiful sheen. You’ll need about 12 ounces total—some for dipping the truffles and extra for creating the bandage drizzles. Candy melts or almond bark work equally well.
Candy Eyes – These whimsical decorations bring your mummies to life! Look for them in the baking aisle during Halloween season, or order them online year-round. You’ll need two eyes per truffle, so plan accordingly based on how many you’re making.
Optional Enhancements
- Black edible marker for drawing mouths
- Mini chocolate chips for alternative eyes
- Orange sanding sugar for festive sparkle
- Lollipop sticks to turn them into truffle pops
- Decorative cupcake liners for elegant presentation
How to Make Mummy Oreo Truffles
Step 1: Crush the Oreos
Place your entire package of Oreos—cream filling and all—into a food processor. Pulse the cookies repeatedly until they transform into fine, uniform crumbs that resemble dark sand. This typically takes about 1-2 minutes of pulsing. Scrape down the sides of the food processor bowl once or twice to ensure all the cookies get evenly crushed.
If you don’t have a food processor, place the Oreos in a large ziplock bag, seal it while removing excess air, then crush them with a rolling pin. This method requires more effort but produces similar results. You want the crumbs fine enough that they’ll hold together when mixed with cream cheese.
Step 2: Mix in the Cream Cheese
Add your room-temperature cream cheese to the Oreo crumbs in the food processor. Pulse again until the mixture comes together into a thick, dough-like consistency. The mixture should be dark, uniform, and slightly sticky. If using the ziplock bag method, transfer the crumbs to a large bowl and knead the cream cheese in with your hands or a sturdy spoon.
The mixture is ready when you can pinch a small amount between your fingers and it holds together without crumbling. If it seems too dry, add an extra tablespoon of cream cheese. Conversely, if it’s too wet and sticky, add a few more Oreo crumbs.
Step 3: Roll the Truffle Balls
Line a baking sheet with parchment paper or a silicone baking mat. Using a small cookie scoop (about 1 tablespoon capacity) or a spoon, portion out the Oreo mixture into equal amounts. Roll each portion between your palms to create smooth, round balls approximately 1 inch in diameter.
Aim for consistency in size so all your mummies look uniform. If the mixture sticks to your hands, lightly dampen your palms with water or coat them with a tiny bit of butter. Arrange the rolled balls on your prepared baking sheet, leaving space between each one.
Step 4: Freeze the Truffles
Place the baking sheet in the freezer for 15-20 minutes. This chilling step is crucial—it firms up the truffles so they’ll hold their shape when dipped in warm melted chocolate. Without proper chilling, the truffles can fall apart or become misshapen during dipping.
While the truffles chill, use this time to prepare your work station for chocolate dipping. Set out your white chocolate melting wafers, candy eyes, and any other decorating supplies you’ll need.
Step 5: Melt the White Chocolate
Place about two-thirds of your white chocolate wafers in a microwave-safe bowl. Microwave in 30-second intervals, stirring thoroughly between each interval, until the chocolate is completely melted and smooth. This gradual melting prevents the chocolate from burning or seizing.
The chocolate should be fluid enough to coat the truffles easily but not so hot that it melts the cream cheese inside. If the chocolate seems too thick, add a teaspoon of coconut oil or vegetable shortening to thin it slightly.
Step 6: Dip the Truffles
Remove your chilled truffles from the freezer. Working with one at a time, drop a truffle into the melted white chocolate. Using a fork or dipping tool, roll it around to coat completely, then lift it out, allowing excess chocolate to drip back into the bowl.
Gently tap the fork against the side of the bowl to remove more excess chocolate, then slide the coated truffle back onto the parchment-lined baking sheet. Repeat with remaining truffles, working quickly while they’re still cold. If the chocolate in your bowl starts to harden, reheat it briefly in the microwave.
Step 7: Create the Mummy Bandages
Transfer the remaining melted white chocolate to a small ziplock bag or piping bag. Snip a tiny corner off the bag to create a small opening. Working over your coated truffles, drizzle thin lines of white chocolate back and forth across each one in a random, slightly messy pattern to resemble mummy bandages.
Don’t worry about being too precise—slightly imperfect, overlapping lines actually look more authentic. Leave a small area near the top of each truffle clear for placing the eyes. The bandages should crisscross in various directions for the most realistic appearance.
Step 8: Add the Eyes and Set
While the drizzled chocolate is still wet, quickly press two candy eyes onto the clear area you left near the top of each truffle. Position them close together for a cute expression, or space them farther apart for a more surprised look.
Once all truffles are decorated, return the baking sheet to the refrigerator for at least 15 minutes to allow the chocolate to set completely. The truffles are ready when the white chocolate coating is firm to the touch and no longer glossy.
Serving Suggestions
These charming mummy truffles look stunning arranged on a Halloween-themed serving platter. Place them on black or orange tissue paper, or nestle them in individual mini cupcake liners for a more polished presentation. The individual liners also make them easier for guests to grab without touching others.
For children’s parties, display these truffles on a tiered stand alongside other Halloween treats. The varying heights create visual interest and make it easier for small hands to reach. Consider labeling them with a cute sign that says “Beware: Mummies Ahead!” or “Unwrap at Your Own Risk!”
At adult gatherings, serve these truffles as part of a dessert board featuring other small sweets, fresh fruit, and nuts. Their bite-sized nature makes them perfect for grazing-style parties where guests prefer sampling multiple items rather than committing to large portions.
Package individual truffles in clear cellophane bags tied with orange or black ribbon to create party favors that guests can take home. This presentation also works wonderfully for Halloween classroom treats or neighbor gifts.
For a more dramatic presentation at dinner parties, serve each guest a plate with 2-3 mummy truffles arranged alongside a small scoop of vanilla ice cream and a drizzle of chocolate sauce. This transforms simple truffles into an elegant plated dessert.
Recipe Variations to Try
Pumpkin Spice Mummies
Add 1 teaspoon of pumpkin pie spice to the Oreo-cream cheese mixture before rolling. The warm spices complement the chocolate beautifully and add an extra layer of autumn flavor.
Peanut Butter Twist
Replace 2 ounces of the cream cheese with 2 tablespoons of creamy peanut butter. This creates a subtle peanut butter cup flavor that peanut butter lovers will adore.
Mint Chocolate Version
Use mint Oreos instead of regular ones for a refreshing minty flavor. Alternatively, add ½ teaspoon of peppermint extract to the standard Oreo mixture.
Dark Chocolate Drizzle
After creating the white chocolate bandages, drizzle additional dark or milk chocolate over the top for contrast. This creates a more complex flavor profile and stunning visual appeal.
Franken-Truffles
Instead of white chocolate, dip the truffles in green-colored candy melts. Skip the bandage drizzles and instead add two candy eyes and use black icing to draw stitches and a mouth, transforming mummies into Frankenstein’s monsters.
Spider Truffles
Coat in dark chocolate instead of white, then use two candy eyes and add pretzel stick pieces as spider legs. Press 4 pretzel pieces into each side of the truffle before the chocolate sets.
Make-Ahead Tips
These mummy truffles are exceptionally make-ahead friendly, which makes them perfect for stress-free party planning. The Oreo-cream cheese mixture can be prepared up to 3 days in advance. Simply store it covered in the refrigerator, then roll into balls when you’re ready to proceed.
Rolled truffle balls (before dipping) can be made up to 2 days ahead. Arrange them on a parchment-lined baking sheet, cover tightly with plastic wrap, and refrigerate. When you’re ready to dip and decorate, let them sit at room temperature for 5 minutes to take the chill off slightly.
Fully finished mummy truffles stay fresh in an airtight container in the refrigerator for up to 1 week. In fact, many people find they taste even better after a day or two when the flavors have had time to meld. Store them in a single layer when possible, or separate multiple layers with parchment paper to prevent sticking.
For longer storage, these truffles freeze beautifully for up to 3 months. Freeze them on a baking sheet until solid, then transfer to a freezer-safe container or bag. Thaw in the refrigerator overnight before serving, and they’ll taste just as fresh as the day you made them.
If transporting these to another location, keep them cold in a cooler with ice packs. The white chocolate coating can become soft and sticky in warm environments, so maintaining cool temperatures is essential for preserving their appearance.
Important Notes
Room Temperature Cream Cheese – This is absolutely crucial for achieving smooth, lump-free mixture. Cold cream cheese won’t incorporate properly and will leave chunks throughout your truffles. Take it out of the refrigerator at least 30 minutes before you plan to start.
Truffle Size Consistency – Try to make all your truffles roughly the same size for even dipping and professional-looking results. Using a small cookie scoop ensures uniformity much better than eyeballing portions.
Proper Chilling – Don’t skip or shorten the freezer time! Inadequately chilled truffles will soften or fall apart when dipped in warm chocolate. The 15-20 minute freezer time is non-negotiable for success.
Chocolate Temperature – Your melted white chocolate should be warm enough to flow smoothly but not so hot that it melts the truffle centers. If the chocolate seems too hot, let it cool for a minute or two before dipping.
Working Quickly – Once you remove truffles from the freezer, work relatively quickly through the dipping process. As they warm to room temperature, they become softer and more difficult to handle cleanly.
Drizzling Technique – For the most realistic mummy bandages, use a small opening in your piping bag and work with quick back-and-forth motions. The lines should be thin and slightly irregular rather than thick and uniform.
Candy Eye Alternatives – If you can’t find candy eyes, mini chocolate chips work well as substitute eyes. Position them pointed-side down for a more realistic eye shape. You can also use white chocolate chips with a dot of black icing in the center.
Frequently Asked Questions
How many truffles does this recipe make?
This recipe typically yields 24-30 truffles, depending on how large you roll them. One-inch diameter balls are standard, but you can make them larger or smaller based on your preference.
Can I use a different cookie besides Oreos?
Absolutely! Golden Oreos, chocolate chip cookies, vanilla wafers, or even gingersnaps work wonderfully. The cream cheese binds with any type of cookie crumb. Just maintain the same proportions.
What if I don’t have a food processor?
Place the Oreos in a large ziplock bag and crush them with a rolling pin until very fine. Transfer the crumbs to a bowl and knead in the softened cream cheese by hand. It requires more effort but produces the same results.
Can I make these without cream cheese?
Cream cheese is really essential to the texture and flavor of these truffles. However, you could experiment with mascarpone cheese or even canned vanilla frosting as alternatives, though the results will differ from the original.
Why is my chocolate coating too thick?
If your melted chocolate seems thick and doesn’t flow smoothly, add ½-1 teaspoon of coconut oil or vegetable shortening. This thins the chocolate without affecting the setting time or flavor. Avoid adding water, which will cause the chocolate to seize.
How do I prevent the candy eyes from sliding off?
Press the eyes onto the chocolate while it’s still wet but starting to set—usually within 30-60 seconds after drizzling the bandages. If you wait too long and the chocolate has hardened, use a tiny dab of melted chocolate as “glue” to attach the eyes.
Can I use regular white chocolate chips instead of melting wafers?
Regular white chocolate chips contain stabilizers that prevent smooth melting. While you can technically use them, you’ll need to add shortening or coconut oil (about 1 tablespoon per cup of chips) to achieve a dippable consistency.
Why did my truffles fall apart when dipping?
This usually happens because the truffles weren’t chilled long enough or the chocolate was too hot. Make sure your truffles are very firm from the freezer, and let your melted chocolate cool slightly before dipping.
Can kids help make these?
Definitely! Children can help crush cookies (especially with the ziplock bag method), roll the truffle balls, and place the candy eyes. The chocolate dipping is best handled by adults due to the temperature and technique required.
How should I store leftover truffles?
Keep them in an airtight container in the refrigerator for up to one week. Let them sit at room temperature for 5-10 minutes before eating for the best texture and flavor.
Recipe Details:
- Prep Time: 30 minutes
- Chill Time: 30-35 minutes (total for both chilling steps)
- Total Time: 1 hour
- Yield: 24-30 truffles
- Course: Dessert, Candy
- Cuisine: American
- Diet: Vegetarian
- Occasion: Halloween, Kids’ Parties, Bake Sales


